I have spent quite some time over the last couple of evenings wrestling with this one. I have never looked at custom intents before; it was also my first attempt at developing in Swift, as I’ve finally realised that there is no point in trying to cling on to Objective C any more.
I caused a runtime error with an incorrect array value assignment in the class that implements the intent handler response which, by virtue of the fact that it’s running in a different process to the app, isn’t visible (the clue I missed here being that you don’t see any print statements either).
While this pointed me in the right direction, here are more exhaustive steps that worked for me, using the simulator:
Assumed starting point: you have all of your wiring set up, with the intents definition, the extension, the two intents classes (identifying the intent called and the handler) at least started, if not fully working, and you have the intent donation in your viewController.
Run the app normally, fire up the shortcuts app, and configure your app specific action. I.e., the point you would normally see the communication error.
Stop the app, change to the intent target, and run again. In the pop up list displaying ‘Choose an app to run’, pick Siri.
Execute the shortcut using the verbal command that you have registered and you should see any intent specific runtime issues in the log.
One other gotcha for me was related to the fact that I have an absolute bare bones implementation as I want to use the shortcut via my HomePod – so no UI for the intent. On the simulator (running the app target normally, and having eliminated my runtime error), I was able to get the intent to run just by launching the shortcut.
On my iPhone, if I tried to run the intent from the lock screen donation, it timed out. My best guess for this is that I’m not doing anything in the app delegate, combined with the fact that the app isn’t in the background – yet – per the checkbox setting in the intent definition file. So I manually stopped the app from running (from Xcode), went back to the donation and it worked.
Two Python scripts: one for a web endpoint, and another to generate push notifications running from cron.
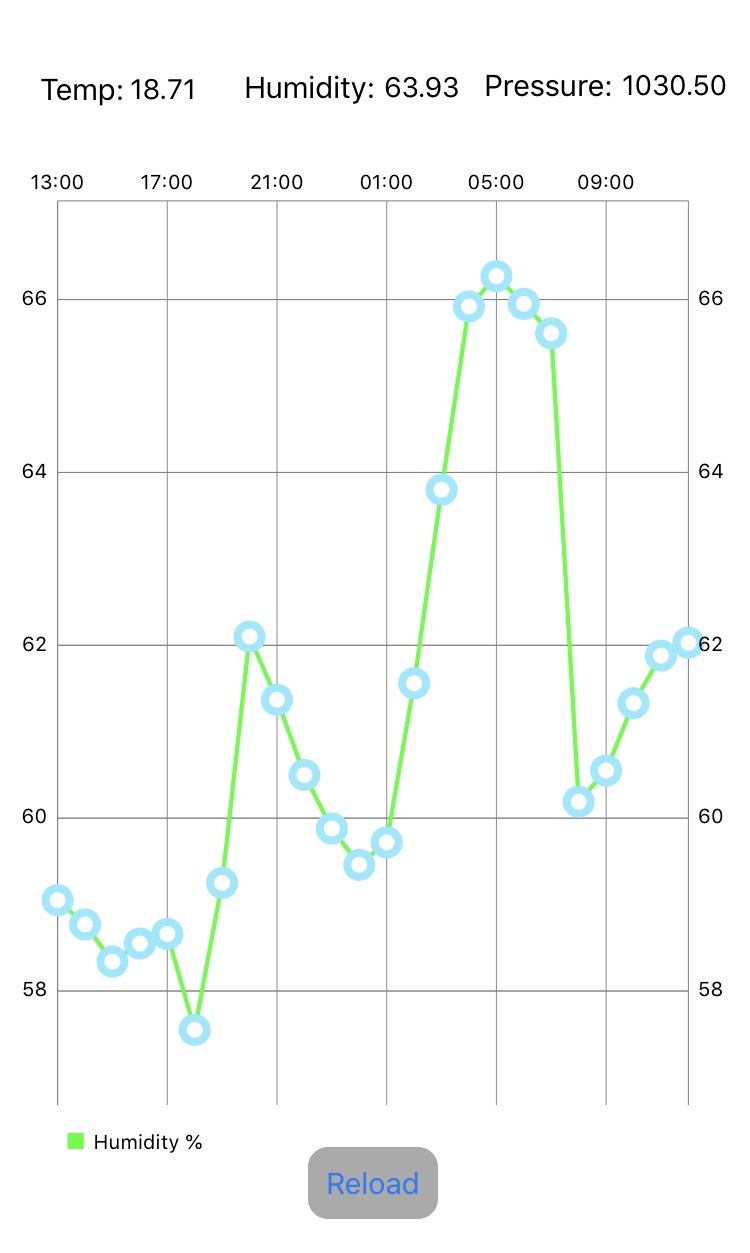
A simple iPhone app to receive the push notifications and to graph the humidity data.
App Screenshot…
I have a small collection of guitars, one of which suffered damage from humidity over the winter. It was a tough lesson: I had no idea that they were so sensitive. I’ve subsequently bought another instrument which I’m now nervous about keeping out of its case.
Having looked unsuccessfully on Amazon for USB connected humidity sensors, I decided to re-purpose a sensor which I’d been using with an Arduino a couple of years back, and which had subsequently been consigned to the attic. I was reasonably satisfied with my first pass: the connection to the GPIO pins on the Raspberry Pi is a lot less faff than processing serial data over USB from the Arduino. I wrote a Python script which ran from cron every hour, and if either the temperature or humidity was over / under a threshold, it would email me. Side by side testing with a borrowed standalone sensor suggested it was reading consistently a few degrees hotter. The only male-to-female jumper wires I had lying around were pretty short, so the most obvious culprit was the heat from the Pi. I ordered some longer ones — and duly broke the sensor somehow when I reconnected it. Doh!
I ordered up a replacement [GY-BME280] which seems a lot more sensitive. A hot spell of weather suggested that something less intrusive than email would be better, so I thought I’d have a quick play with iOS push notifications. I ended up using OneSignal, who have a generous free tier. One slight constraint is that their Python library is for V2 only, and the dependencies for the sensor had already committed me to V3. Having gone through the app setup on OneSignal’s admin interface, and a quick browse of their API [simple for my purposes], I use requests to send the notification instead:
Obviously the vendor library takes care of the exact syntax of the Authorisation header. That took a bit of testing to see exactly what was required when rolling my own API call.
I generate the CONTENT_TXT based on some if / elif statements earlier in the code. I took a different approach when I was using email: the content was additive, so if both the temperature and humidity were over the threshold, I’d get all of the info. Now, the first one to trigger wins as there isn’t a lot of real estate in the notification window. As an aside, the code above doesn’t process the response from the OneSignal endpoint. If it failed for some reason, I could resort to email, but that is a little circular for my implementation.
It’s rather one-dimensional having a boilerplate app on the phone which does nothing other than receive the push notifications, so charting seemed like a sensible addition. The state of the art has certainly moved on from when I first used charting in my weight tracking app [it was 7 years ago!]. There are a couple of components to this: the first is a very simple web service with a couple of endpoints [using Flask], the first of which returns historic data generated by a script called by cron – which I’ll come back to – and the second which calls a script to get live data from the sensor.
The cron script – the same one that generates the push messages – retains the last 24 hours of data on a rolling basis. I managed to make pretty heavy work of this, but here’s what I’ve come up with:
 with open(dataFile) as json_file:
         data = json.load(json_file)
         json_file.close()
         data['allData'].append(dataPoint)
         currentLength = len(data['allData'])
         if currentLength > 24:
             # This should always only be deleting the single, front-most element:
             delta = currentLength - 24
             trimmedData = data['allData'][delta:]
             trimmedData = {"allData":  trimmedData}
             data = trimmedData
         with open(dataFile, 'w') as outfile:
             json.dump(data, outfile)
             outfile.close()
The JSON structure is an outer dictionary with a single value, the array of ‘dataPoint’ dictionaries, where each of those is a single reading. Where I got myself into a bit of trouble was with this line:
trimmedData = data['allData'][delta:]
…which returns the ‘inner’ array reduced by the delta number of values from the front, rather than the ‘outer’ dictionary which wraps the array. There is probably a better way of doing this – not using the outer dictionary, for instance – but it works.
Programmatically, the iPhone app itself is pretty trivial. The more complicated part – relatively – is stepping through the install and config of the OneSignal SDK [plus admin processes on their web UI] and cutting the push certificate, but it’s all well documented.
I’m still clinging on to writing Objective-C which is starting to feel akin to admitting that I like to code in Latin. One aspect of Charts which took some digging into was how to put custom labels on an axis – in Objective-C. At the same time I parse out the readings into a mutable array of data entries…
Functionally, that’s pretty much it. There are a couple of extra decorations, the most significant of which is only attempting to haul the data down from the endpoints when the phone is connected to my home network. While I have the facility to carve out a DMZ on my network, this endpoint isn’t going to be the trigger for me to take the plunge. One body I’ve buried up to this point is that the Python scripts which connect to the GPIO need to run as root. There are ways round this, but it’s a utility vs effort trade-off thing. The same goes for using Flask, which is calling a script which runs as root.
Well I work in security, so it’s nice to let my hair down at weekends 🙂 .
The second minor detail of this implementation is that unfortunately Apple doesn’t allow the configuration of the push notification capability without signing up as a full developer. When I deleted my apps from the Apple Store last year, I decided to let my developer subscription expire.
While you can do quite a lot without it, having to recompile apps every 3 months or so can be a nuisance – something that was reinforced when my wife was asking me what I was doing on my Mac 10 minutes before a taxi was due to take us to the airport last week. The answer: re-compiling the iOS password manager that I wrote, and am quite reliant on when travelling. Instinctively, I knew this was the wrong answer 🙂 .
I’ve spent the last few weeks working on iOS app to use a Feitian BLE Multipass token. When I get to the final version of that I’ll do a separate posting but parsing the raw messages to and from the device turned out to be pretty challenging. Unfortunately, if you send something that doesn’t conform to the required format, rather than getting an error back, you get no response at all. This makes debugging [particularly at the start, when I really didn’t know what I was doing] tricky.
While the standards for both the FIDO BlueTooth spec and the raw message format are both well written, there are a few bits that aren’t immediately clear, and that I couldn’t find documented anywhere.
The Feitian device enforces a maximum fragment size of 20 bytes. Any arithmetic I use in the rest of this write-up will assume this, but that will vary from one device to another. Also, I will tend to use the actual number of hex characters transmitted. As the payloads are double byte, this will mean that a decimal value will be derived by converting a hex value to decimal, and then doubling it.
Sending An Enrolment Command
The first fragment you send looks like this:
The FIDO command prefix has the value 830049. The 83 indicates a message, the 00 is a blank high data length, and 49 is the length in hex, which equates to 73 in decimal, 146 characters. This is derived from adding together the APDU command prefix [14 characters], the concatenated challenge and application parameters [128], and the a final 4 characters, all zeroes, which are the APDU Le values.
The APDU command – the example I’m using is enrolment – has the value 00010000000040. As per section 3.1 of the raw format spec, that’s a preceding 00, then the enrolment command of 01, then a bunch of blank parameters, and ultimately the 40, which equates to the 64 bytes for the combined length of the challenge and application parameters.
For each of the subsequent chunks, you have a payload [in the Feitian’s case] of 19 double bytes, plus one more byte for the order. The last message includes the 4 bytes for the Le values.
Parsing the Response
The response is a bit trickier. First, the device may respond with a FIDO keep alive command, which is 82000101. So before I start concatenating the full response, I check that the individual chunk value doesn’t equal this. Just a quick detour into the implementation: the BlueTooth spec says that the values you get back from the token will be Big Endian double bytes. I couldn’t find a nice way of processing these using an NSUTF value, so I just convert them to text and parse out the angle brackets and spaces.
On to the processing. The first six characters I get are 830259. Per the spec, 83 is playing back the original command. 259 in hex means that the total length of the response will be 1202 characters. That’s going to vary: both the attestation certificate and the signature are variable length. For my implementation, I calculate a running total, so that I know when the final message has been sent.
So, there is no APDU header at all in the response. After the 6 character FIDO header, you get straight into the standard payload as per the spec. You have a legacy 05, then 130 characters for the public key, then a key handle length. For my device, the value is 60, which translates [96 in decimal x 2] to 192 characters.
The next part took quite a bit of digging, which is figuring out the length of the attestation certificate. The certificate starts with the following: 30820168. While my read of DER encoding of ASN.1 [ugh!] is that the length specification can vary, for me, that 0168 is the length in hex, equating to 360 bytes. Add back in 4 bytes to include the header [30820168], that gives me an attestation cert length of 728 characters.
What remains is 144 characters. The last 4 are 9000, which per the raw message spec is the SW_NO_ERROR value.
And that’s it. 6 weeks of trial and error in about 700 words.