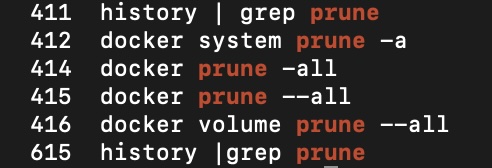
Building an E-Ink Calendar Display

A few weeks ago I saw a link to this project on Daring Fireball and it really caught my eye, so I decided to have a go at doing something similar based around the same WaveShare 7.5 inch screen. So over the course of the last few evenings and weekends, what I’ve produced so far is this:

A future in industrial design is not beckoning….

The Enclosure
Before I get into the development, I’ll cover the blindingly obvious: the enclosure is a bit of a mess. Those are soldering iron marks across the bottom of the frame for the screen. Having never tried it before, I thought it would be an interesting sub-project to use some CAD software to design an enclosure and order up a 3D print. It turns out that ‘having a go’ at CAD is about as good an idea as ‘having a go’ at parking an aircraft carrier. Anyway, in the process of doing battle with the software on my iPad I managed to get an internal ‘y’ dimension wrong by a whopping 5mm, and ended up having to carve an extra cavity to slot the screen into. So, to cover that mini crime scene, what was intended as the top of the enclosure is now on the underside and covered with gaffer tape.

Let’s pretend none of this happened and move on…

The Screen
As covered on the original posting, there are significant limitations with this E-Ink screen. I don’t mind about the refresh: as I will go on to explain in more detail, I currently only update it once every 15 minutes. What the original author doesn’t mention and which I found much more restrictive is the 1 bit colour depth. I now know more about typefaces than I ever thought I’d need to in my life. On a ‘normal’ screen and assuming the text is black, most fonts – as a sized, weighted and rendered instance of a typeface – are going to be displayed with anti-aliasing, the shades of grey that smooth out the jagged edges of any non horizontal or vertical lines. No access to those shades means jagged edges are the order of the day. I toyed with using dithering instead, but the results were worse. While you are obviously free to use any typeface you like, the results are going to be variations on the theme of ‘awful’. While I tried a few – I found a few resources suggesting Verdana, but it looked a bit meh – I ended up using a TrueType font that comes with the sample code for the screen.

The TL;DR Version

I have two Python scripts, running on an old Raspberry Pi 3 (which I use for other Philips Hue control related stuff such as this). The first is a lightly modified Google example script which pulls down the next 10 events from a shared calendar. It writes the data out both as a pipe-separated file for some post processing, and also as a HTML table. [Update 17/04/22: all other things being equal, the example script stops working after a week. See this for more info.]

Those post processing steps are performed by a second Python script which also calls a BBC RSS feed, and then eventually renders the various content as a 1 bit bitmap for the screen to display. Both scripts are called from cron: the calendar processing twice a day, and the rendering every 15 minutes. The two main tables alternate in prominence.

Warts And All…

I’ve included some detail on elements of the implementation which I tried and didn’t work. Part of what made the project interesting was figuring out what was viable in terms of the screen’s display capability and, generally, revising downwards.

Starting Point for the Calendar Content

The initial motivation for this was a tongue in cheek attempt to convert my wife from using a wall calendar. What I thought might be an interesting approach would be to use Selenium and chromedriver to authenticate to Google Calendar, screenshot the month, crop it down to size and convert it.

Authentication

It appears that Google may block this. Regardless, I dismissed this out of hand: I’d not thought about the implications of 2FA, so that was a showstopper (just… no, don’t :). What I settled on was the Google calendar API, using this example code from Google. It requires you to configure a Cloud project and then permission an API key for OAuth2.

So: you run the script on the command line, which initiates the Authorisation Code grant flow, printing a url to standard out. You paste this into your browser of choice – I copied this from a Putty window into Chrome on my PC – and authenticate with Google. It then redirects you to a url on localhost (not running, in my case). I copied this url from the browser, put it in quotes to avoid the shell interpreting the ampersands on the path, prefix it with the wget command and then paste it back into a separate ssh window. This then populates a json file with an access and refresh token which will be used without the browser interaction going forward.

It sounds convoluted but it’s actually straightforward in practice, and it’s a common enough approach for demonstrating grant flows without full application integration. (I’ve actually written something in the same ballpark myself, although my implementation was a lot simpler.) It’s also a lot more ‘joined up’ if you are running the browser on your Pi, as the localhost redirect will resolve to the little server the code spools up for the duration.

Update: 17/04/22: unless you ‘publish‘ the client, the example code will only be allowed to haul down tokens which expire after a week. I’ve gone with a simpler alternative, discussed here. Back to the original post…

I’ve made a couple of minor tweaks to the code. One is to change from the default ‘primary’ calendar to a shared one. You just find the calendarId string by using the ‘try this method’ built into the documentation.

The second change is writing the event data out to a couple of files for onward processing. In order to make that as simple as possible, I ‘flatten out’ the dates that the API returns. There is a gotcha here, because recurring events are returned without a start time so:

try:
   formattedDate = datetime.datetime.strptime(start, '%Y-%m-%dT%H:%M:%S%z')
except ValueError:
   # recurring events like birthdays just have:
   formattedDate = datetime.datetime.strptime(start, '%Y-%m-%d')
   formattedDate = formattedDate.replace(hour=12)

I hadn’t expected this at all, particularly as recurring events are rendered at a time on every Google Calendar UI I’ve seen, and the change in date format only emerged when I started adding birthdays to the shared calendar, which broke the original parsing – without the ‘try’.

Content Display (and wasting more time with selenium)
While I’d abandoned using selenium and chromedriver for the Google calendar screen grab, I hadn’t completely given up on it for other content rendering. It’s actually quite convoluted to get working. Using pyvirtualdisplay as a way of convincing the operating system that you’ve got a display to run X on is straightforward enough, but the versions of chromedriver and chrome itself have to match up exactly. At the time of writing the former is lagging the latest chrome release, and getting a slightly older version to work required a workaround.

The thing that made me finally abandon it was that something I had working one day (browser.find_element_by_xpath to click on ‘Most Read’ on the BBC website) stopped working a day or two later. I never got to the bottom of why chromedriver was saying it couldn’t find the element, and finally realised that RSS would be an awful lot simpler.

Up until that point I’d also been using chromedriver as a way of rendering and screenshotting the html table for the calendar events. I decided to use imgkit to do this instead. It has its foibles, specifically with UTF characters, so I may swap it out at some point.

As I alluded to earlier, while with the benefit of hindsight the whole approach around selenium reads like a bad idea (or, to put it another way, utter madness) from the get-go, it reflects the fact that over the period of the couple of weeks that I was working on the project, there was a lot of trial and error with figuring out what the screen was capable of displaying. Although as 1 bit colour depth clearly suggests, the answer to that is ‘not much’.

The last significant decision was how to present the two main pieces of content: the BBC headlines and the calendar events. Because of the lack of anti-aliasing, bigger text is better. Rather than just display one at a time, what I decided on is overlapping, and then flipping them every 15 minutes. This way, you get to see the most news- or time significant information either way round. I’ve got some clunky code to read / write out a single word to file – either ‘beeb’ or ‘cal’ indicating which was the last ‘top’ item. Depending on which of the two’s turn it is, I set the frame coordinates and, most importantly, the order that I call PIL’s Image paste method.

The last part was having something useful in the opposite corners the main tiles of content leaves. The date was a no brainer. The ‘up next’ thing took a little more work and at the moment is the only consumer of the serialised event data.

Tidying up

As well as the appearance of the table, there are a few stragglers that I may get round to tidying up. I check the length of the headlines before I print them out, truncate them if they hit a character limit, and add ellipses. I have no idea if there is any kerning magically happening with the TrueType font. I don’t check any of the other lengths – and the Pil Image Draw function will display exactly what it’s given, for instance, which could get interesting with longer event titles.

Another possible enhancement is very specific to my implementation but brings up a feature of the API call: it decides whether or not to return event data based on the end time. There doesn’t seem to be a way of changing this to start time. This would have been handy for me as I import calendar data from an external source which creates all day events that aren’t actually useful after the start date has passed. As the start time is returned by the API (recurring events not withstanding), it would be trivial to post process this.

The Implementation

There’s nothing terribly exciting about the implementation but the two python scripts are here. As ever, the repo is principally intended for my own backup purposes. The various dependencies (sourced from git, pip3 and apt-get), while not documented explicitly, are all fairly self evident.