We were at a wedding last weekend in North Antrim. It’s a part of the world that I’ve been to many times by virtue of having family in Ballycastle [same connection that was getting married in fact]. It’s a lovely part of the world: anyone planning a trip to Ireland who doesn’t incorporate a drive along the Causeway coastline is missing a treat.
I took about 300 pictures at the wedding and reception the day before we went down to the Causeway. I had my best results of the day bouncing the flash for a few outside shots to get some fill and catchlights. I didn’t do any adjustment to the exposure settings, just did a half click in aperture priority mode, and then hit the button to pop up my on-camera flash. I achieved some very intersting effects on a day where there was quite a lot of cloud cover, but still more than bright enough to operate without the flash.
I’ve only started playing with the flash, i.e., not shooting on full auto, in the last couple of months or so. Beyond studio work, mastering a flash has got to be the most technically demanding part of photography. As a consequence, it’s something that I’ve started to try as I’ve gained in confidence in other areas.
I also took quite a lot of indoor shots using the same technique. Starting at the classic setting of 1/60 second at F8, I tried various aperture and shutter speed settings to see what sort of effects I could get. I got some interesting shutter drag effects but it was a pretty hit and miss affair, with the results tailing off towards the end of the night as the beer started to take its toll :).
Final thought on the flash: I’ve pretty much made up my mind to take the plunge at the end of the year and buy a 430 EX II.
On to the Causeway itself, our second World Heritage site in less than two weeks. There were a couple of limiting factors, starting with equipment. It’s the sort of venue that is crying out for a tripod. Given the high contrast range between the rock formations and the sky, it would be a really good candidate for bracketing and HDR. Also, as it can be quite busy, a number of layered exposures would probably give you the option to delete people from the finished scene. But we were on a long weekend break and flying with a low cost airline [carry-on luggage only], so the tripod stayed firmly at home.
The other limitation was a hangover of epic proportions: one of those real humdingers that looms over you making fizzing and spitting noises.
Anyway, I’d decided in advance [of the trip, rather than the hangover] that I wanted to push my 10-22, with quite close-up foregrounds, and long depth of field settings. This first shot is pretty much straight out of the camera, just with some increased saturation, imperceptible dodging and burning on the rocks, and a little bit of levels adjustment on the sky:
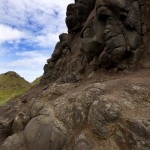
The picture that I’m most pleased with, and the one that I’ve spent more time on in post than any picture I’ve ever taken [about 6 hours I reckon] was this one. Here’s the ‘before’ shot, straight out of the camera:
So it’s that standard washed out look that you get with RAW. I quite like the composition [even if it hasn’t got an awful lot to do with the rule of thirds], but the obvious problem is with the the sky. I used evaluative metering, and with the predominantly dark rock formations in the foreground, the sky is completely burnt out. There is also some chromatic aberration, which it’s hard to criticise the lens optical quality for, given the very high contrast.The first couple of hours that I spent working on the image was trying to add a sepia tint and some vignetting, for no reason other than I thought it would rescue the shot. Although I found some good tutorials on this, the results were still pretty disappointing, basically because the contrast of the sky was completely out of balance with the effects that I was applying.
So I moved on to trying to replace the sky completely from a different shot. The easiest way of doing this is with magic wand tool. I have never managed to get any decent results with this tool, and to be fair, the fringing around the mountain didn’t give it much to work with this time.
What took me the most time was getting my head around what I really needed to do, which was to use a masking layer. I’ve worked my way through a few tutorials on this in the past, but never really got it. I’ve said before: despite working in IT for my entire career, I find Photoshop [and Elements at that] pretty tricky to use. Anyway, I persevered this time, starting by moving a strip of sky into the background layer from another image. Next I created a levels adjustment layer, then combined this with the ‘sky’ layer. I then painted the foreground covered by the ‘new sky’ out back in, using a softer and more opaque brush as I approached the edge of the rock formation and mountain.
It’s not perfect by any stretch, but it’s a fair improvement on the original shot:
With the benefit of hindsight, I’ve replaced something that’s completely overexposed with sky that’s just moderately over-exposed. But I’ve reached a tipping point with this particular shot: the results as they stand are reasonably satisfactory, and I’m not convinced that the raw material in the original composition warrants starting from scratch. Interesting exercise though.

![1/60sec at F18, ISO 500 at 10mm [Before] 1/60sec at F18, ISO 500 at 10mm [Before]](https://the-plot.com/blog/wp-content/uploads/2009/06/20090614_3291_before-150x150.jpg)
![1/60sec at F18, ISO 500 at 10mm [After] 1/60sec at F18, ISO 500 at 10mm [After]](https://the-plot.com/blog/wp-content/uploads/2009/06/20090614_3291_after-150x150.jpg)