Shed Weather: a Journey Into Questionable Purpose

I’ve been continuing to fiddle around with my Arduino over the last few weeks, trying out various sensors and screens. One breakout board on the online store I’ve been using caught my eye, the delightfully named BMP180 Barometric Pressure / Temperature / Altitude sensor. I’d very nearly taken the plunge a few months ago with one of these, so I thought it would be an interesting project to try and build something along the same lines: install an Arduino in the shed [which has a power supply] and somehow or other get the temperature back to the Raspberry Pi. Some quick googling led me to here. The author of that Instructable article has done a very nice job, which I’ve borrowed the principle of: using two Arduinos, and a 433MHz RF link between them to transmit the data. What I wanted to add into the mix was an iPhone app, which necessitates a server component. That factor is why I’m not going to list all the code here: having a hosting service comes with a monthly bill [and a lot of other capability], which I think will very much limit the broader applicability. But there are a few points that I encountered, which I think are worth going into some detail.

First, the shopping list:

  • 2 x Arduino Uno boards. [£22 each].
  • As well as the barometric pressure board [£8], also using an HTU21D humidity sensor.
  • Aforementioned RF Link kit: [£2].
  • 2 x wire coat hangers, more of which later. Not sure how much these cost, but they tend to come with free clothes.
  • 1 plastic takeaway food container for the shed based components to sit in.

There were some other incidentals in the mix such as breadboards and jumper wires; I also repurposed an old iPhone charger for the outdoor sensor.

The pattern I decided to take was pretty simple: I’d connect the sensors to the first Arduino which is outside [well, inside the shed] and send the results in a continuous loop [every second] over the RF link, to be picked up by the receiver. I’d then run some code on the Pi, picking the data off the serial port, which I’d then send to a database server.

Getting the RF Link to work, using the VirtualWire library, was pretty straightforward. The hard bit is getting it to work if the transmitters were more than a few centimetres apart – note the picture in the Instructables article’s final page, and how far apart the two components are [i.e., not very!].

I spent a lot of time on this. I really didn’t want to have to run a second power adaptor to crank up the DC input to 12V, which is the maximum that the RF transmitter can handle [obviously this would be a direct connection, not the toast-making approach of trying to run 12V through the Arduino]. I ended up making a Yagi antenna, which I have to admit was a term I’d never come across before yesterday. If you google for some combination of terms for home made antennas for 433Mhz transmitters, you will invariably come across the same image, which is half way down this bulletin board. I followed the instructions, using the wire coat hangers, and it works. I have one end of the ‘live’ parts of the antenna connecting to the transmitter, and the other connecting to ground. I also used a dirty little hack which I saw somewhere else: I connect both the 3.3V and the 5V outputs of the Arduino to the input of the transmitter – note that this on its own wasn’t enough to cover the distance I need with the V1 antenna [17cm of wire], something like around 25 feet.

Yagi Antenna [post feline damage]So I was chuffed with the result, as without it, the project would have been a right off. One unintended consequence: within an hour of putting the thing in the garden, the cat promptly sat on it and broke off one of the elements. It still works. I have the cable running under the door of the shed, and used a glue gun to try to make sure that all of the connections were waterproof.

One slight problem I encountered was that the signal wouldn’t penetrate through to the place I originally intended having the receiver and Raspberry Pi: the corner of the house is in the way, so I had to relocate the Pi to a spare bedroom. This meant that my lovely little TFT screen is now redundant.

I messed around with the code quite a bit, and it wasn’t without its complexity. I’ve written before about coding in Perl to read off the serial port, and the approach that I had been taking was to embed a call to the serialPy Python library. I’ve discarded this and now use the Device::SerialPort library which is actually pretty elegant. My original approach to this was to run the Perl as a process, and then check that the process was still running with a cron job. This was based on some prototyping when I was taking readings from the sensors on a directly connected Arduino. This is much more reliable, so I was just sending the data from the sensor at the intervals that I wanted – hourly. As I mentioned earlier, I am now sending from the external board every second. I’ve refactored the code to be called from cron, which runs once and then fires the data up to the database. Note that I currently assume that the script will complete within the hourly cycle. I might as well include the Perl actually, as it introduces the database component:

#!/usr/bin/perl

# post to Arrest-MySQL via curl looks something like:
# curl --data "tempC=77.4&time=2014-01-22 19:02:01" http://yoursite.com/Arrest-MySQL_installdir/tablename

use Device::SerialPort;
use DateTime;

my $port = Device::SerialPort->new("/dev/ttyACM0");
$port->databits(8);
$port->baudrate(9600);
$port->parity("none");
$port->stopbits(1);

$gotAllThree = 0;

$gotTemp = 0;
$gotHumidity = 0;
$gotPress = 0;

while($gotAllThree == 0) 
{
   $lastEpoch = time();
   my $char = $port -> lookfor();
   $char =~ s/[^!-~\s]//g;
   # print $char;
   if ($char =~ /T:/)
   {
      $dt2 = DateTime->now(time_zone=>'local');
      $ymd = $dt2->ymd;
      $timeString = $dt2->hms(':');
      $timestamp = $ymd . " " . $timeString ;
      $char =~ s/Received: T: //;
      print "In temp:\n";
      if ($gotTemp == 0)
      {
         print "T: curling\n";
         my $server_endpoint = "http://yoursite.com/Arrest-MySQL_installdir/tablename";
         system("curl --data \"tempC=$char&time=$timestamp\" $server_endpoint");
         $gotTemp  = 1;
      }
   }
   if ($char =~ /H:/)
   {
      # print "got humidity: $char\n";
      $dt2 = DateTime->now(time_zone=>'local');
      $ymd = $dt2->ymd;
      $timeString = $dt2->hms(':');
      $timestamp = $ymd . " " . $timeString ;
      $char =~ s/Received: H: //;
      print "In Humidity\n";  
      if ($gotHumidity == 0)
      {
         print "H: curling\n";
         my $server_endpoint = "http://yoursite.com/Arrest-MySQL_installdir/tablename";
         system("curl --data \"humidity=$char&time=$timestamp\" $server_endpoint");
         $gotHumidity = 1;
      }
   }
   if ($char =~ /P:/)
   {
      # print "got pressure: $char\n";
      $dt2 = DateTime->now(time_zone=>'local');
      $ymd = $dt2->ymd;
      $timeString = $dt2->hms(':');
      $timestamp = $ymd . " " . $timeString ;
      # print "pressure time stamp is $timestamp\n";
      $char =~ s/Received: P: //;
      # last char is a dot?
      $char =~ s/\..*//;
      # print "pressure is now $char\n";
      print "In Pressure\n";  
      if ($gotPress == 0)
      {
         print "P: curling\n";
         my $server_endpoint = "http://yoursite.com/Arrest-MySQL_installdir/tablename";
         system("curl --data \"millBars=$char&time=$timestamp\" $server_endpoint"); 
         $gotPress = 1;
      }
   }
   if (($gotPress == 1) && ($gotHumidity == 1) && ($gotTemp == 1))
   {
      print "we got at least one hit\n";
      $gotAllThree = 1;
   }

My original intention was to use an Amazon RDS instance, as this is free for a year which, if I’m honest, will be long after I’ll probably be bored with this set up and have pulled it apart. Using the whole AWS interface is kind of what I imagine having a quick go at piloting an aircraft carrier would be like: you tend to wonder what all of the buttons do. To put it another way, it’s very much geared up for an enterprise approach. All that said, I got it working [once I’d figured out how to disable the default and admirably paranoid firewall settings that prevent any external connections whatsoever]. Three days later I got my first bill, which was for a couple of bucks, for storage usage I think. From what I can see, the first year is free provided that you don’t actually use it.

I had a fallback option, which was the hosting service I use for this blog, and which allows me up to 3 mySQL installs, including the one that is used for WordPress. The only downside, and the reason it was second choice, is that there is no shell access: all of the database setup is via a web interface [phpMyAdmin].

I’d already realised from some early research that I needed to transform the data into JSON somehow or other. Googling ‘iOS SQL client’ quickly pointed me away from a native interface. What I finally settled on was a thing called Arrest MySQL. Note to self: the link I use for this is buried, but I need to add a .htaccess file to at least have a fig leaf of security. By default, simply posting to the interface will insert data into the table, if you know where to look.

So it’s working, and I am reliably informed that the outside [well, ‘shed’] temperature was 7.43 degrees Celcius, pressure was 988 Mb and humidity 68% the last time the cron job fired off. The iOS client is well under way too. It’s back to the coalface that is Core Plot for the primary functionality.

I’ve learned a lot from this, but end to end it’s something of a plate spinning exercise, however. The RF link obviously isn’t that reliable. I’ve also not really used a database before, and am having to figure out how to trim the data as I go, using events. It also makes sense to do other transformations [say turning the 24 hourly values into a daily average] server side as well.

But I think the reliability issue is what may make me strip it down and move onto the next Arduino-driven bauble that catches my interest :).

Adding a Speaker

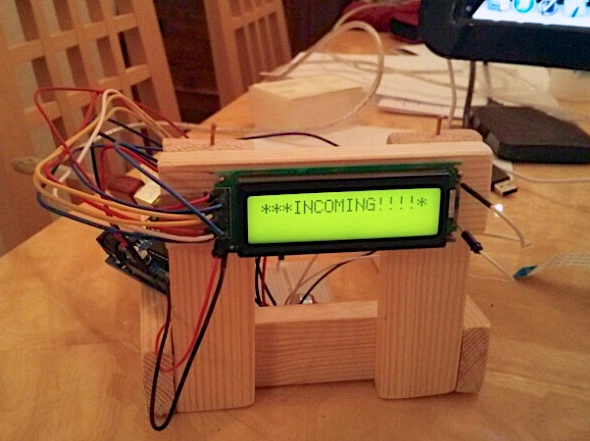
This was a piece of cake: I realised that just scrolling ‘Incoming!’ isn’t particularly attention grabbing, so I ripped a speaker out of a redundant toy [freebie phone extension speakers from a conference I think], and wired it up to one of the digital outputs. When the code identifies the termination character in the message body, it plays the series of tones. This is straight out of the tutorial.

Someone pointed out that the reason that the POP library was occasionally having problems parsing emails being sent by different mail user agents was possibly down to the send format – plain text versus HTML or RTF.

Email to LCD By Way of Arduino

There are plenty of tutorials out there for this, but I’ve taken a particular tack to pull the data down on the Raspberry Pi which, because it’s fundamentally torturous, I’ve not seen anyone else take. So here goes…

The idea is that I use Tasker on my phone to set GeoFences, and then using the email plugin for it, send a message to a spare account [one that I originally set up for the motion detection]. I then haul down the email, parse out the body, and then send it down over the serial port to the LCD connected to the Arduino. All of which is so that I can “impress” my wife to [I can almost hear her eyes rolling] with a fundamentally daft piece of technology while I’m out of the house :). Let the “I’m in the pub!” messages ensue….

The easiest way to do the serial communication is using the pySerial library. Unfortunately, I don’t know Python at all, and so reverted to Perl as my scripting glue of choice. Getting this combination working was one of the trickiest steps of the whole process, as the Debian version of Perl is a little strange to navigate. I installed cpanimus, and then tried to install Inline-Python. This failed, complaining about a missing library, so I then installed python-dev via apt-get [which, in Raspberry Pi life-on-an-SD-card terms, is massive – 43mb]. I repeated the Inline-Python install which then worked fine, only to discover that there aren’t a plethora of examples explaining basics like passing in variables to inline methods.

Next step was which POP3 library to go with. I tried about 4, before settling on POP3Client [installed via sudo cpanm]. BTW, I’m not using TLS, because I’ve found it to be a little bit hit and miss with my ISP, and there are enough things that can go wrong with this project already. Needless to say you should use it wherever possible. You probably want an account dedicated for this anyway.

Before getting on to talk about the serial port comms, it’s worth taking a minute over the connecting of the LCD. I can’t solder for toffee, and managed to break the first LCD I tried [not sure how]. FWIW, this is just a random 16×2 LCD which supports HD44780, and which I ordered up from a crew called HobbyTronics [great service]. The dodgy carpentry was just a way of stabilising the display. What I ended up doing was putting a blob of solder on the end of each pin, and then pull it through from the back. There’s actually a piece of cardboard underneath to firm up the contacts – not exactly production quality, but hey, it works :).

Serial port communication is fundamentally unreliable. I experimented for quite a while with this: the termination of the data is a given, but I also tried delimiting the start of the message as well. Regardless, the repeated padding prequel data worked for me. I can imagine that this is going to be very display-dependent.

A couple more gotchas. The POP client appends what I initially thought was binary data to the string containing the body of the email message, which was appearing as a corrupt character on the LCD. It’s actually a control character, which I globally substitute out.

Having done all my sketch development and testing on the Mac, I then hit the hardy perennial of power consumption problems with the Raspberry Pi, because I have both USB ports occupied [WiFi and the Arduino]. At the standard 150 milliseconds that the scrolling method example on the Arduino website suggests, the text was borderline unreadable, so I tuned this down to 350 milliseconds. Finally, I found that the scrolling text wrapped on me, if I just offset by the length of the display string [again, as per the example]. I was running out of steam by this point, so I just subtracted the width of the display from the length of the string.

On to the code. First the POP3 to serial port client, that I run every minute as a cron job on the Raspberry Pi:

#!/usr/bin/perl
use Mail::POP3Client;
$pop = new Mail::POP3Client( USER     => "your\@email.com",
                               PASSWORD => "yourPassword",
                               HOST     => "your.email.server.com" ) || die "failed: $!\n";
$messageCount = $pop->Count();
#print "$messageCount messages\n";

# just confirming the message counter starts at 1.
# The newest message is at the bottom so we will set the body array to that value:
$textForLED = $pop->Body($messageCount);
# appended character removal:
$textForLED =~ s/(\r\n)//g;

# Only read the newest message; housekeeping is delete everything else that might be there:
for( $i = 1; $i Delete($i);
}
$pop->Close();

if ($messageCount == 0)
{
   # This is vestigial: as I run the script every minute, I don't want to display
   # any filler content if there is no email.
   #print "message count is zero\n";
   # http://numbersapi.com/number/type
   #$randNum = int(rand(5000));
   #$textForLED = `curl -s http://numbersapi.com/$randNum/trivia`;
   #print $textForLED;
}

else
{
   # this was for debug purposes:
   open (LOGFILE, ">>/home/pi/temp_sensor/logdata.txt");
   print LOGFILE "Email content: $textForLED, \n";
   close (LOGFILE);
   # Add the character to terminate:

   $textForLED = $textForLED . "^";

   for ($repeatCount = 0; $repeatCount<= 1; $repeatCount++)
   {
      serialPipe($textForLED);
   }

# This indentation can't be changed for inline code:
use Inline Python => q{

def serialPipe(textIn):
   #print 'Hi, %s.' % textIn
   import serial
   import time
   ser = serial.Serial('/dev/ttyACM0', 115200)
   for x in range(0, 5):
      ser.write('*************************************')
      time.sleep(1)
   ser.write(textIn)
   #ser.write('test message^');
};
}

and now the sketch:

#include 

// Connections:
// rs (LCD pin 4) to Arduino pin 12
// rw (LCD pin 5) to Arduino pin 11
// enable (LCD pin 6) to Arduino pin 10
// LCD pin 15 to Arduino pin 13
// LCD pins d4, d5, d6, d7 to Arduino pins 5, 4, 3, 2
LiquidCrystal lcd(12, 11, 10, 5, 4, 3, 2);

//int backLight = 13;    // pin 13 will control the backlight

void setup()
{
  //pinMode(backLight, OUTPUT);
  //digitalWrite(backLight, HIGH); // turn backlight on. Replace 'HIGH' with 'LOW' to turn it off.
  lcd.begin(16,2);              // columns, rows.  use 16,2 for a 16x2 LCD, etc.
  lcd.clear();                  // start with a blank screen
  lcd.setCursor(0,0);           // set cursor to column 0, row 0 (the first row)
  //lcd.print("About Bleeding");    // change this text to whatever you like. keep it clean.
  lcd.setCursor(0,1);           // set cursor to column 0, row 1
  //lcd.print("time!");
  delay(3000);
  Serial.begin(115200);
  
  // if you have a 4 row LCD, uncomment these lines to write to the bottom rows
  // and change the lcd.begin() statement above.
  //lcd.setCursor(0,2);         // set cursor to column 0, row 2
  //lcd.print("Row 3");
  //lcd.setCursor(0,3);         // set cursor to column 0, row 3
  //lcd.print("Row 4");
}

void loop()
{
   lcd.clear(); 
   String ledDisplay;  
   boolean endOfText = false;
   while ((Serial.available() > 0) && (endOfText == false))
   {
      //Serial.println('looping');
      char inByte = Serial.read();
      if (inByte != '^')
      {
          ledDisplay = ledDisplay + inByte;
      }
      else
      {
         for (int repeatCount = 0; repeatCount <=3; repeatCount++)
         {
            lcd.setCursor(0,0);
            lcd.print("***INCOMING!!!!***");
            delay(2000);
            for (int positionCounter = 0; positionCounter < 18; positionCounter++)
            {
              lcd.scrollDisplayLeft();
              delay(350);
            }
            delay(1000);
            lcd.clear();
         }       
         for (int repeatCount = 0; repeatCount <=4; repeatCount++)
         {
            lcd.setCursor(0,0);
            lcd.print(ledDisplay);
            delay(1000);
            for (int positionCounter = 0; positionCounter < (ledDisplay.length() -16); positionCounter++)
            {
              lcd.scrollDisplayLeft();
              delay(350);
            }
            delay(2000);
            lcd.clear();
            delay(1000);
         }
         for (int repeatCount = 0; repeatCount <=3; repeatCount++)
         {
            lcd.setCursor(0,0);
            lcd.print("***THAT IS ALL***");
            delay(2000);
            for (int positionCounter = 0; positionCounter < 17; positionCounter++)
            {
              lcd.scrollDisplayLeft();
              delay(350);
            }
            delay(1000);
            lcd.clear();
         }  
         endOfText = true;
         ledDisplay = "";
         delay(5000);
         lcd.clear();
      }
   }
   delay(1000);
}