
I was lucky enough to get my Apple Watch last week through the ‘expedited delivery’ option that was offered to developers on a random basis, and I’m really pleased with it.
I’ve written a very simple app to understand the communication between the watch and the phone, and it’s unearthed a couple of interesting points. Before that, setup: you need to add the watch’s unique ID to the rest of your devices on the Apple dev portal, and create a new developer profile. You’ll also find that you want to mess around with Xcode to change the logging: it can’t show logs from the phone and the watch at the same time as they are separate processes, so you will need to switch between them.
So the simple app: I thought it would be fun to display the current location of the International Space Station on a map. Note that there is no ‘glance’ for this app. Having first added the WatchKit app template to a single view project, I added the following elements to the Watch storyboard:
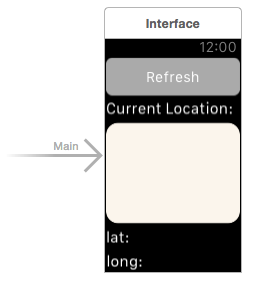
So simply a button, the WKInterfaceMap and two separate labels. I’ve then created outlets and actions as you’d expect, in the InterfaceController.h:

In the awakeWithContext method, I call a method to do the communication with the phone and render the results:
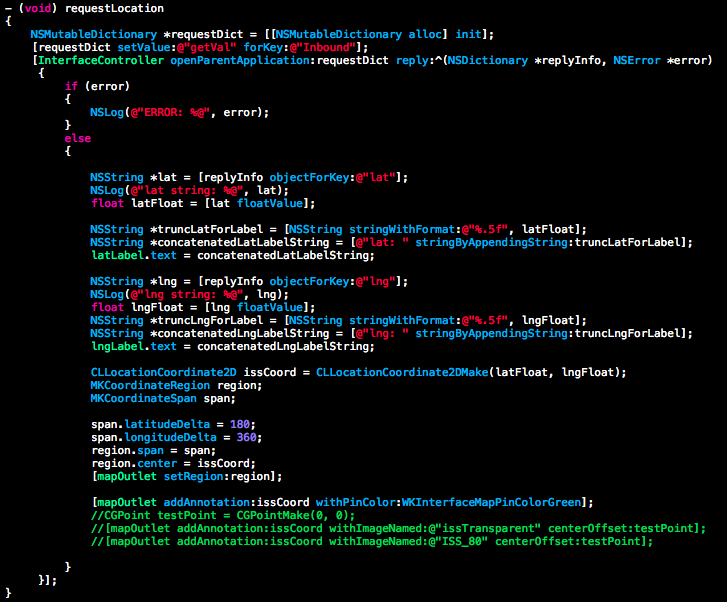
I also call this method from the action for the ‘refresh’ button, after deleting the current location pin.
So the main communication is with the openParentApplication, where you both send and receive data in an NSDictionary. It’s all nice and clean. A quick explanation around the way I’ve marshalled the data: I’ve sent the latitude and longitude values over in the dictionary as strings. Not one for the purists, but you have as much work to do with NSNumbers, and the two values are ultimately going to be set as string values for the labels anyway.
One interesting point to call out here is the part of the code I’ve commented out. Rather than a pin, I thought it would be nice to display a little image of the ISS as an alternative. I spent quite a lot of time on this, and the conclusion that I’ve come to, so far at least, is that the Watch doesn’t support images with transparency [an alpha channel]. I posted to the Apple Developer Forum [the thread is here; authentication required], and that seems to be the consensus. I also tested this with a WKInterfaceImage and had the same result. While I’ve seen quite a few references to transparency, especially in articles about animation, I’ve failed to get it to work – and the same goes for the other people on the developer forum thread. Either there are other options in the SDK, or there may be something baked into the image metadata that the WatchKit doesn’t like. I’ve tested with transparent images I’ve used in traditional iOS apps, which I’ve created myself using Gimp.
Anyway, on the phone side of the communication, you use handleWatchKitExtensionRequest:
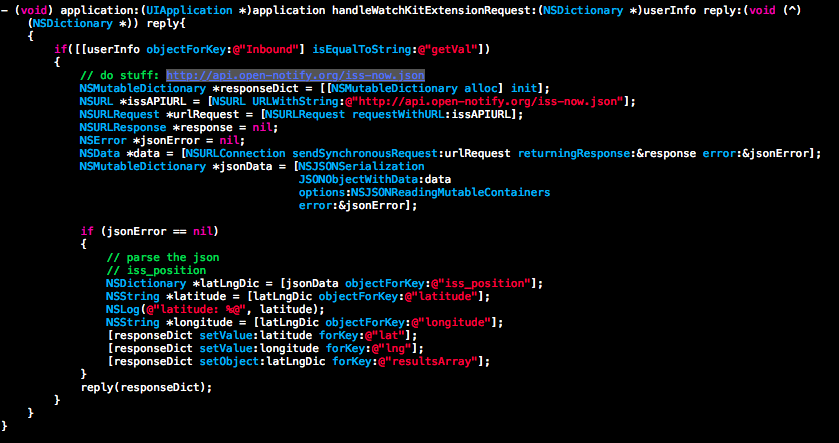
So the first thing to notice here is that it’s completely synchronous: that reply(responseDict) is getting populated in this method call. It took me a while to figure out the implications of this. Initially I was going to use an async variant of NSURLConnection, when I realised that the connectionDidFinishLoading data delegate wasn’t going to be much help here: there is no way of joining the dots between identifying the end of the response from the web server in that delegate method and then populating and calling the reply back up in the handleWatchKitExtensionRequest.
There are so many methods that return results asynchronously, not just at the network level, that dealing with them in iOS is a constant refrain. The way I normally do this is to farm the entire functionality out to a class, and then set a key value observer on the setting of a property in the class instance. I’ve used this recently for getting results back from the keychain – which I’ll come back to in a second.
I’m not sure what the implications of this are: there may be a way round it that is either beyond my knowledge of the WatchKit or Objective C. While one option would be to prepare data and save it locally – this is all on the phone – for the response through background processing, there may be reasons why you don’t want to do this. Data that depends on the keychain is an obvious example.