Two Python scripts: one for a web endpoint, and another to generate push notifications running from cron.
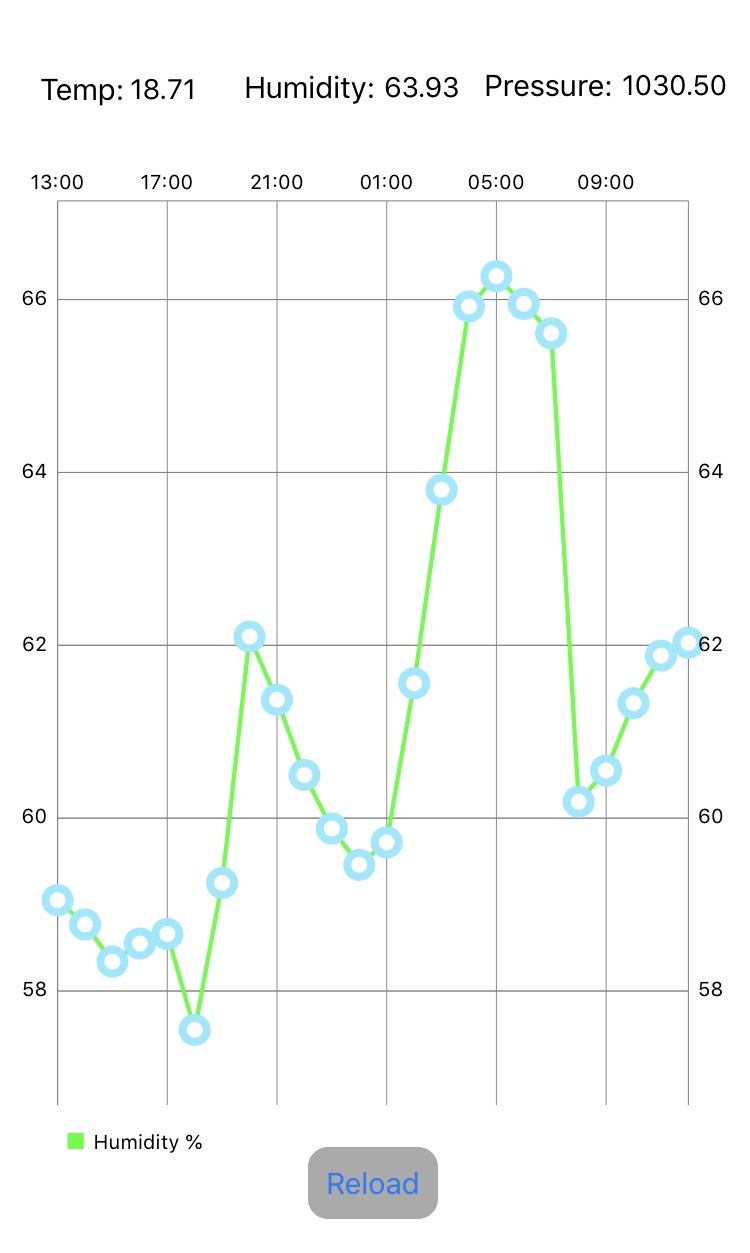
A simple iPhone app to receive the push notifications and to graph the humidity data.
App Screenshot…
I have a small collection of guitars, one of which suffered damage from humidity over the winter. It was a tough lesson: I had no idea that they were so sensitive. I’ve subsequently bought another instrument which I’m now nervous about keeping out of its case.
Having looked unsuccessfully on Amazon for USB connected humidity sensors, I decided to re-purpose a sensor which I’d been using with an Arduino a couple of years back, and which had subsequently been consigned to the attic. I was reasonably satisfied with my first pass: the connection to the GPIO pins on the Raspberry Pi is a lot less faff than processing serial data over USB from the Arduino. I wrote a Python script which ran from cron every hour, and if either the temperature or humidity was over / under a threshold, it would email me. Side by side testing with a borrowed standalone sensor suggested it was reading consistently a few degrees hotter. The only male-to-female jumper wires I had lying around were pretty short, so the most obvious culprit was the heat from the Pi. I ordered some longer ones — and duly broke the sensor somehow when I reconnected it. Doh!
I ordered up a replacement [GY-BME280] which seems a lot more sensitive. A hot spell of weather suggested that something less intrusive than email would be better, so I thought I’d have a quick play with iOS push notifications. I ended up using OneSignal, who have a generous free tier. One slight constraint is that their Python library is for V2 only, and the dependencies for the sensor had already committed me to V3. Having gone through the app setup on OneSignal’s admin interface, and a quick browse of their API [simple for my purposes], I use requests to send the notification instead:
Obviously the vendor library takes care of the exact syntax of the Authorisation header. That took a bit of testing to see exactly what was required when rolling my own API call.
I generate the CONTENT_TXT based on some if / elif statements earlier in the code. I took a different approach when I was using email: the content was additive, so if both the temperature and humidity were over the threshold, I’d get all of the info. Now, the first one to trigger wins as there isn’t a lot of real estate in the notification window. As an aside, the code above doesn’t process the response from the OneSignal endpoint. If it failed for some reason, I could resort to email, but that is a little circular for my implementation.
It’s rather one-dimensional having a boilerplate app on the phone which does nothing other than receive the push notifications, so charting seemed like a sensible addition. The state of the art has certainly moved on from when I first used charting in my weight tracking app [it was 7 years ago!]. There are a couple of components to this: the first is a very simple web service with a couple of endpoints [using Flask], the first of which returns historic data generated by a script called by cron – which I’ll come back to – and the second which calls a script to get live data from the sensor.
The cron script – the same one that generates the push messages – retains the last 24 hours of data on a rolling basis. I managed to make pretty heavy work of this, but here’s what I’ve come up with:
 with open(dataFile) as json_file:
         data = json.load(json_file)
         json_file.close()
         data['allData'].append(dataPoint)
         currentLength = len(data['allData'])
         if currentLength > 24:
             # This should always only be deleting the single, front-most element:
             delta = currentLength - 24
             trimmedData = data['allData'][delta:]
             trimmedData = {"allData":  trimmedData}
             data = trimmedData
         with open(dataFile, 'w') as outfile:
             json.dump(data, outfile)
             outfile.close()
The JSON structure is an outer dictionary with a single value, the array of ‘dataPoint’ dictionaries, where each of those is a single reading. Where I got myself into a bit of trouble was with this line:
trimmedData = data['allData'][delta:]
…which returns the ‘inner’ array reduced by the delta number of values from the front, rather than the ‘outer’ dictionary which wraps the array. There is probably a better way of doing this – not using the outer dictionary, for instance – but it works.
Programmatically, the iPhone app itself is pretty trivial. The more complicated part – relatively – is stepping through the install and config of the OneSignal SDK [plus admin processes on their web UI] and cutting the push certificate, but it’s all well documented.
I’m still clinging on to writing Objective-C which is starting to feel akin to admitting that I like to code in Latin. One aspect of Charts which took some digging into was how to put custom labels on an axis – in Objective-C. At the same time I parse out the readings into a mutable array of data entries…
Functionally, that’s pretty much it. There are a couple of extra decorations, the most significant of which is only attempting to haul the data down from the endpoints when the phone is connected to my home network. While I have the facility to carve out a DMZ on my network, this endpoint isn’t going to be the trigger for me to take the plunge. One body I’ve buried up to this point is that the Python scripts which connect to the GPIO need to run as root. There are ways round this, but it’s a utility vs effort trade-off thing. The same goes for using Flask, which is calling a script which runs as root.
Well I work in security, so it’s nice to let my hair down at weekends 🙂 .
The second minor detail of this implementation is that unfortunately Apple doesn’t allow the configuration of the push notification capability without signing up as a full developer. When I deleted my apps from the Apple Store last year, I decided to let my developer subscription expire.
While you can do quite a lot without it, having to recompile apps every 3 months or so can be a nuisance – something that was reinforced when my wife was asking me what I was doing on my Mac 10 minutes before a taxi was due to take us to the airport last week. The answer: re-compiling the iOS password manager that I wrote, and am quite reliant on when travelling. Instinctively, I knew this was the wrong answer 🙂 .
A couple of months ago, what should have been a routine upgrade via the WordPress UI started alarm bells going off: fail2ban was complaining about the version of PHP I was using. My attempt to update PHP turned into a can of worms, because the version of Debian that I use on the vm for hosting was pretty old. I thought it would be an interesting learning exercise to build out a new vm for the upgrade using Docker [and Docker compose] for WordPress, MySQL, PostFix and Dovecote. ‘Interesting’ turned out to be ‘quite a lot of work’.
I didn’t use the stock WordPress container: there are a few customisations that I wanted to add, and which [at the time] seemed a bit tricky to shoehorn in.
The main thing I wanted to do was to get a certificate from LetsEncrypt on startup; I’ve created a cron which should request a replacement cert every month; I also have a pretty nasty script which scans the Apache log files for people trying to break in, and adds them to iptables [I was never convinced that fail2ban was working as intended]. That’s another cron job, which runs every half hour. I’ve also added in a few utilities for debug. Finally, I have some static content – a pretty large galleries directory – which lives outside WordPress, and which I need to copy across.
There is a very heavily starred container – docker-mailserver – which took care of Dovecote and PostFix; it’s fantastic. I’ve configured it to mount in the volume where the WordPress certificate lives. I’ve noticed that its fail2ban is configured in turbo-facist mode: I initially couldn’t understand why I couldn’t connect to the server from my laptop. fail2ban had immediately blocked our public IP when it hit the server with an old password from my phone.
One other gotcha was around port exposure. I obviously didn’t want to map the MySql port to the outside world, but I got stuck at the WordPress install page that asks for the database details. I finally figured out that I needed to refer to server by its container_name.
There is a balancing act in terms of what to bake into the container. My it’s-exploded-and-I-need-to-start-from-scratch approach is to build my WordPress docker image; deploy it using docker compose; then import a backup using the All-In-One plugin. I had a bit of a think over whether or not to bake that in as well in but decided against it. While I could wget it [the same way I do with WordPress itself], it would have to be a reference to a particular version rather than the latest.
So my WordPress container isn’t exactly a work of art: it’s pretty flabby, with all of the nonsense I [tell myself I] need. In some performance testing, I also noticed that WordPress returned its results considerably slower than the hand-rolled equivalent. It’s hardly surprising: this is running on OVH’s cheapest vm and, with 3 containers running it has a fair bit on its mind.
Anyway, if you actually know anything about Docker, you can amuse yourself with my efforts here.
If you have landed here, it’s either because I’ve bored you
rigid about photography and foisted the link on you directly, or you’ve googled
something obscure like ‘Botswana and Tatooine’ and are wondering what goggles
to pack for your own trip.
The TL;DR version: no matter how long you are staying, pack for about 3 days. Assuming you don’t fancy 40 degrees Celcius in the shade and are going in winter, take a wind-proof coat, a warm hat, and something to cover your nose and mouth. Maybe not goggles though: the lions will assume you’re an idiot and bite your head off.
Packing and Clothes
Packing for this trip turned out to be something of an art form. As most of the camps in the Okavango Delta are very remote you will likely need to travel by light aircraft, which imposes a 20kg total luggage limit; the bags also have to be soft, so no wheelie cases. If the planes are busy (ours weren’t), you can look forward to being weighed with your bags. I’m not entirely sure what happens if you exceed a limit on a busy flight. Maybe you have to travel on your own when you’re thinner.
My camera bag weighed 7kg, which left me with a bit of a
struggle to pack everything else in.
I bought a 50 litre holdall which turned out to be a little small, coming in at 9kg fully packed, with enough spare capacity to buy a postcard or a nice sheet of A4. I really regretted not taking a GoreTex shell that I didn’t have room for. The temperature for the morning drives was around 10 degrees Celcius, which started to feel pretty bloody cold after half an hour: while my clothes were warm enough, they weren’t wind-proof. The jeeps at different camps were kitted out with a variety of blankets, fleecy ponchos (if you’ve gotten past the part where you might get weighed in front of the pilot and the other passengers, you can see that these trips don’t really cater for your vanity) and blankets. I took a peaked cap, but could have done with something warmer. I also missed the part where our travel agent recommended taking lip balm. I expect my lips will grow back at some point.
All of the camps we stayed at do laundry to accommodate the luggage limitations; you may need to wash your smalls though. I guess close encounters with apex predators might have some unintended consequences in that department. It’s a weird thing to get your head around, but you probably only need to pack for about 3 days, regardless of how long you’re staying.
Now we get on to the juicy part: what to wear.
Oh. My. God.
Lots people were dressed like… Let’s say a paratrooper crossed with Crocodile Dundee – except that they were mainly in their 60s and and from Surrey. I admit that I packed what I jokingly call my high performance trousers, a pair of middle-age affirming Rohans that I bought nearly 20 years ago. These have been quite useful for other trips down the years as they are fast drying (or what the Rohan blurb would probably call something like ‘UV activated surfactant wicking’, under a picture of someone rugged pointing meaningfully at the horizon). For this holiday, the most active we got was climbing into the jeeps. If your trousers need to be fast drying, it’s most likely because you spilled some white wine on them.
None of the big cats can see in colour [well, they have very limited colour perception], so wearing your army issue greens and browns is largely pointless. I asked two of our guides about this separately and they both agreed. One, a former soldier, joked about having to take cover. If your last line of defence is pattern dispersal, you’re screwed. The only rule is ‘not very bright’: if you are shuffling around in the jeep in your disco shirt, it may break the illusion that the vehicle is a single entity which the cat will ignore. Other colours may have a bearing on insects: wearing black will obviously make you sweat like one of these:
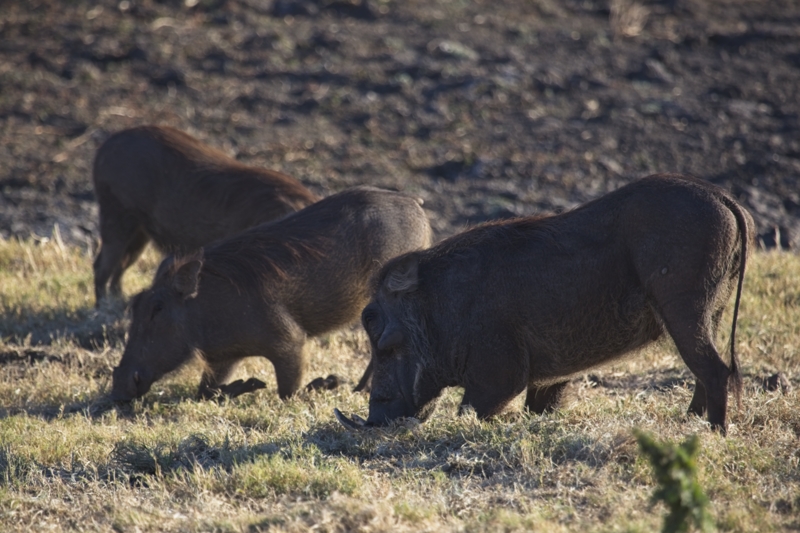
Warthogs – ISO 200; F5.6; 1/250 second
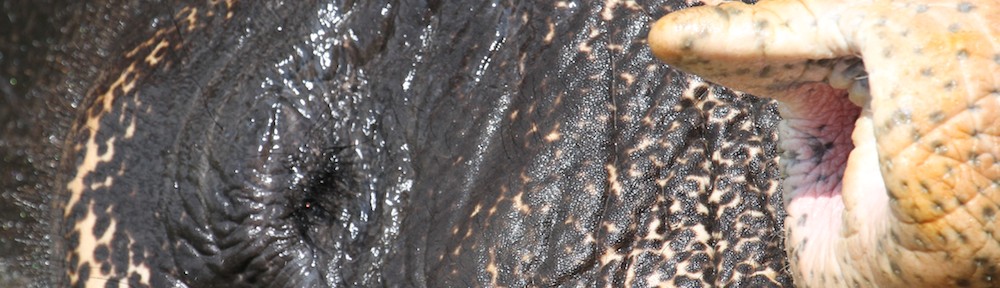
The final packing observation is about dust. The delta is in the Kalahari Basin so everything that isn’t wet is covered in a very fine sand, and it gets everywhere. We saw a few people wearing the sort of masks you see cycle couriers wearing. I saw one person who was wearing a mask, untinted skiing goggles, a hat and a scarf wrapped over everything. If you can imagine a Tusken Raider with an expensive jacket and a Nikon… I ended up improvising with one of my wife’s scarves. The dust is quite abrasive: I’ve noticed that Touch ID on my iPhone has stopped recognising my thumb print on my right hand, which has worn down to nothing. It’s probably not very good for you over the long term.
Kit: Wins and Fails
I brought two lenses: a 24-105L and my 100-400L. I also took my 1.4x extender, which I used for a couple of bird shots and the aard-animals (which I’ll come back to), which we couldn’t get close to. Having to focus
manually with it is a pain in the arse. I could have left the walkabout lens at
home. My wife’s OnePlus has a fantastic camera, and I was conscious of getting
dust on the sensor with changing lenses. I’m going to get my camera body
serviced at some point over the summer. I must have taken it in and out of my
bag hundreds of times over the course of the holiday to try to minimise the
dust exposure, but it’s got to have been affected by it.
One piece of kit that served me particularly well was a pair of noise cancelling Bose earphones which I’d researched, and bought in Duty Free on the way out – QuietComfort 20s. They were fantastic for the flights (particularly the small planes). The camps we stayed in were universally noisy
at night – both wildlife and, at Kanana, some sort of generator or water
heater. I’m a light sleeper so they were a godsend.
The biggest fail was inconsequential but amusing: my FitBit.
With the shaking around on game drives I got credited with tens of thousands of
steps that I didn’t take. On one record breaking day that I barely walked the
length of myself I apparently clocked up 29k.
Masuwe Camp, Zimbabwe
We flew into Jo’burg with Virgin Atlantic, our first time on a 787. I was particularly taken with the button to tint the windows instead of having an old school sliding shutter. It also managed to land in ‘mist’ (which in this case is a euphemism for ‘fog’): we were told we were making a ‘special landing’ (that got our attention!), which required us to turn off all electronic equipment, including kit already in flight mode. The continuing mist then caused a 3 hour delay to our hop to Vic Falls airport in Zimbabwe. The queuing for visas there was farcical: you really need to know in advance what you want [we needed a Kaza visa for Zambia] and it was fairly apparent that most people didn’t.
Our guide picked us up and drove us to Masuwe Camp. We were the only guests there for the two nights we stayed, and it was fantastic. We dumped our bags and went straight out on a game drive, where we saw some elands (massive antelopes) which are a little uncommon, and then came back for dinner. I think the chef was bored: he really pushed the boat out.
Giant Elands
The reason the video above is quite grainy is because it was sunset, which is way past my long lens’ bedtime.
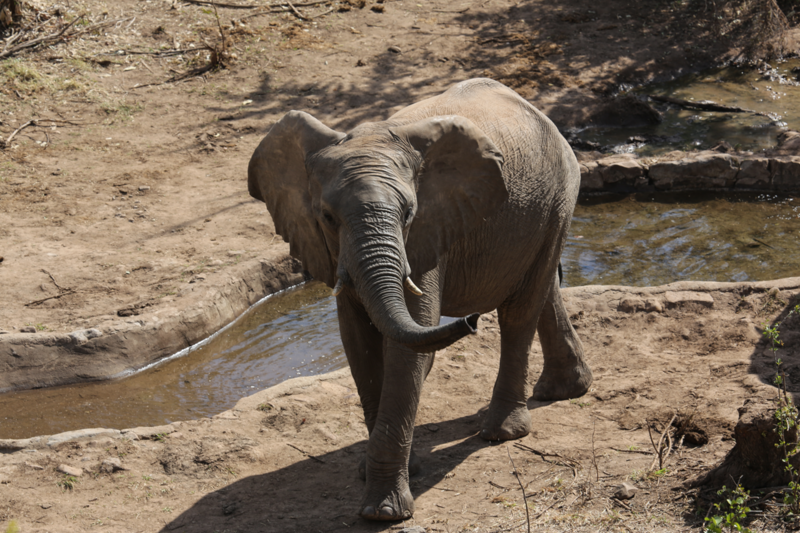
The camp has an artificial water hole which attracts a range of animals (mainly elephants and buffalo). It was good fun sitting up on the balcony watching the passing traffic.
View from the balcony at Masuwe – ISO 100; F9; 1/160 second
No cats though. We had a couple of raiding parties: vervets. Our first morning, they stole the jam from our table and, on the second, the toast. On the latter occasion I tried shooing the thing off with my napkin. It paused for a heartbeat and mentally went ‘yeah, right’, and ignored me, picking up the slices it had knocked onto the ground one at a time. I know from previous holidays that they’re dangerous, so I was pretty half-hearted about it.
We did wonder if they saved any of the jam from the morning
before…
All of the camps we stayed in had a policy of accompanying
the guests to their rooms after sundown. I initially thought this was a bit of
theatre, up until the point on the first night when we couldn’t get back to our
room because a buffalo decided to come and have a drink from the swimming pool.
On our first full day we had a trip to the falls (which were breathtaking), which we followed with a walk across the border for an hour in Zambia. One of the guys in work (Andre) has been to 120 countries, so I’m determined to clock up as many as we can! Anyway, apart from a fantastic view of the falls from a bridge on the other side of the border, it was a bit sketchy: a very hard sell from a couple of hawkers who walked with us for about 5 minutes. It was just the right side of threatening.
We rounded off our last full day in Zimbabwe with a pleasant enough – by which I mean boozy – boat trip on the Zambezi. Wildlife-wise it was a mix of hippos and birds.
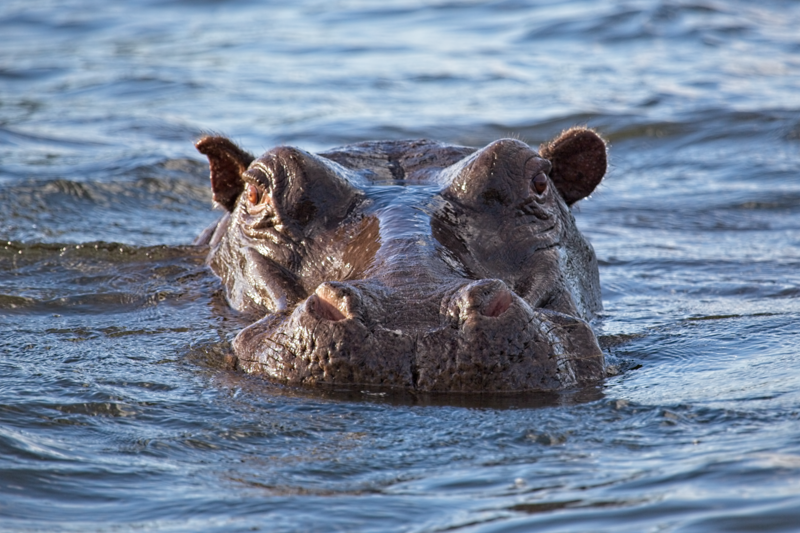
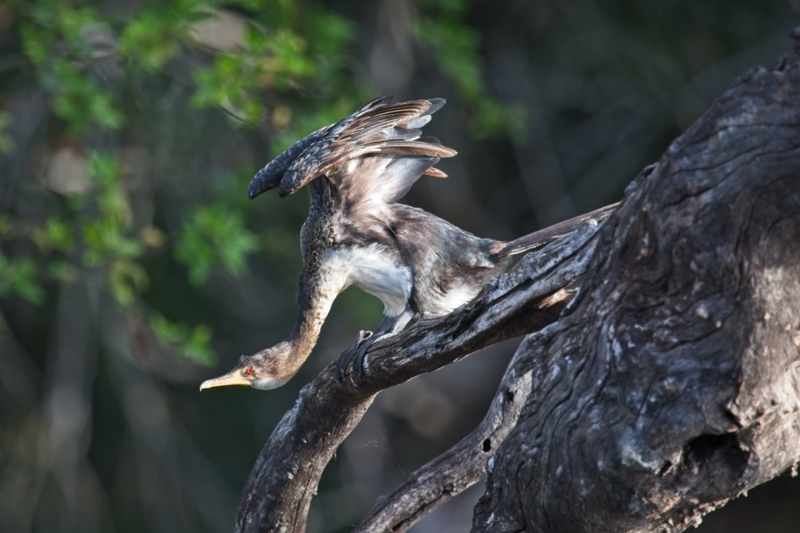
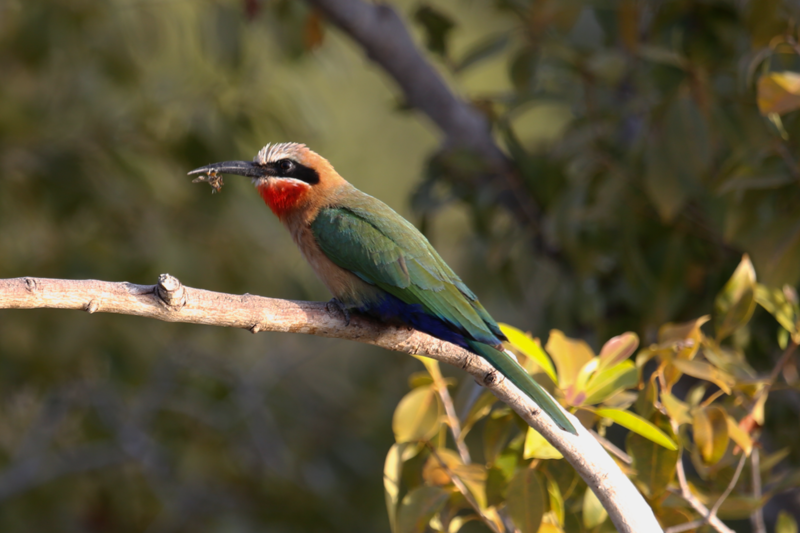
Hippo – ISO 250; F5.6; 1/500 second Cormorant, about to launch – ISO 800; F5.6; 1/400 second A bee eater (not eating a bee, the shithead) – ISO 250; F5.6; 1/320 second
Chobe Elephant Lodge, Botswana
We had a short drive across the border, via Kasane airport, to our next lodge which was just outside the Chobe national park. The routine there was the same for the rest of the holiday: up before 6; breakfast at half past; out for the first drive; back for about 11:30; lunch at midday; break until 3 (because it’s hot enough even at this time of the year to reduce the animal activity); ‘high tea’, and then out for the second drive or boat trip.
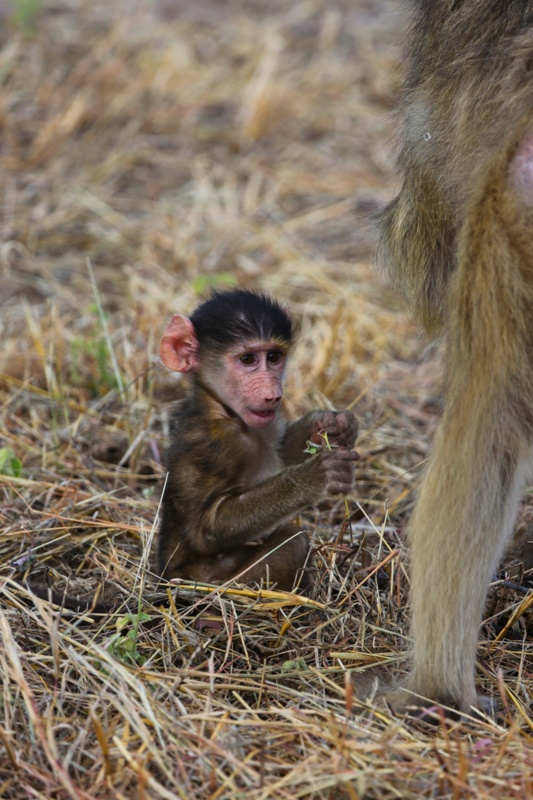
Baboon kitten (possibly not the right term) – ISO 200; F5.6; 1/250 second
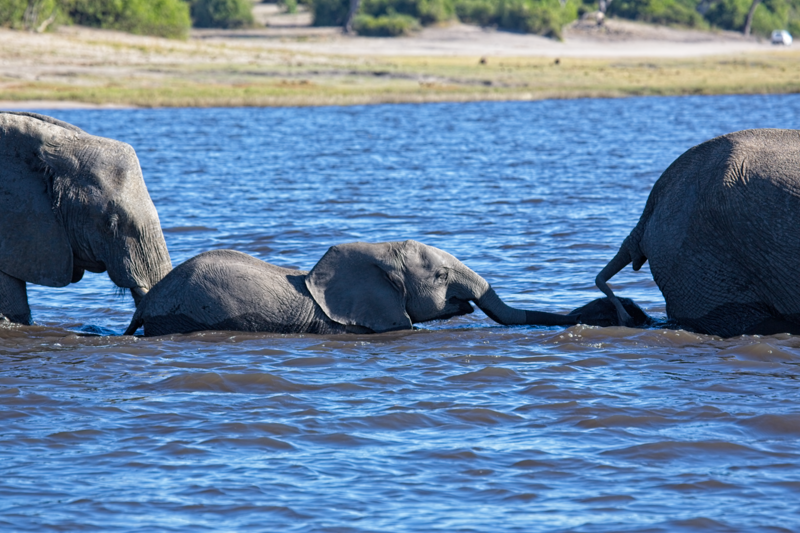
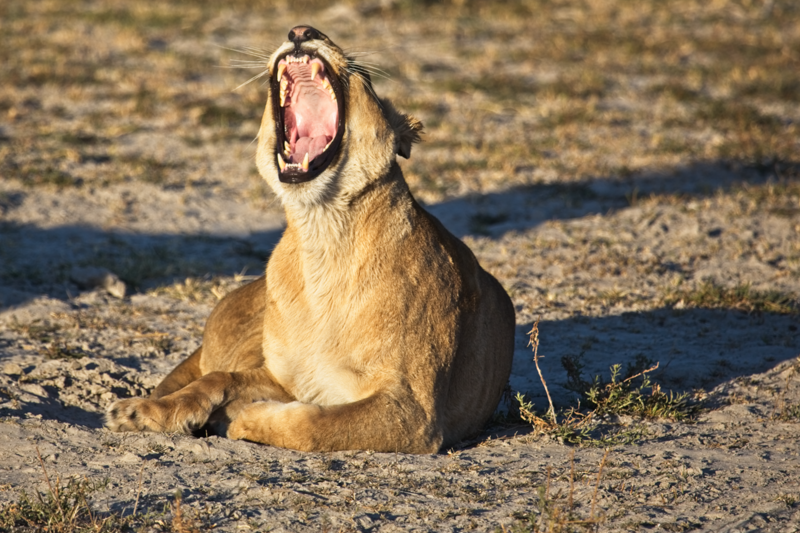
We had our first lion encounters in Chobe, which was fascinating. We also had an obscured view of them munching on something unlucky on our second day. Towards the end of our stay we had a pretty interesting boat trip, the highlight of which was watching a small herd of elephants crossing the Chobe river.
River crossing – ISO 200; F8; 1/400 second Tidying up – ISO 200; F5.6; 1/160 second
This cracked us up: it’s a group of young elephants ‘head-waggling’: our guide said that when they are this young they have trouble controlling their heads because of how heavy they are. I’ve subsequently googled it and there may be other explanations…
…regardless, it reminded me of this:
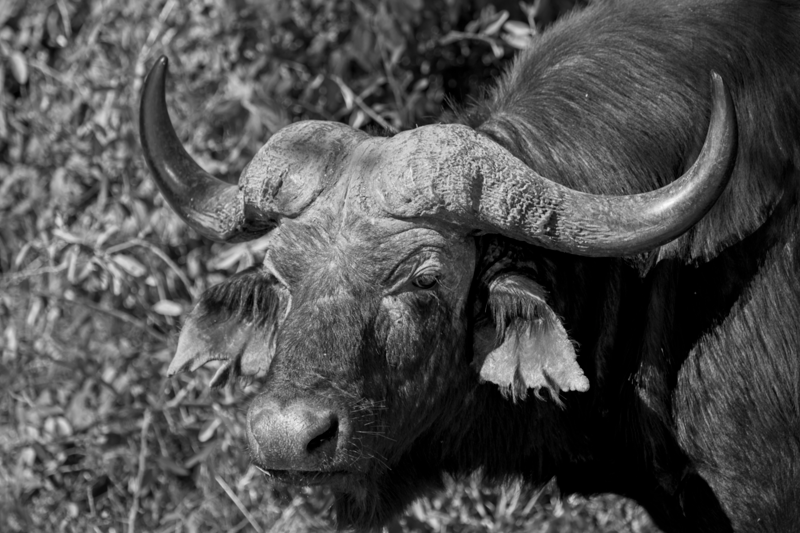
Fast forward to about 1:16Giraffe (partially deflated) – ISO 100; F5.6; 1/640 secondBuffalo: short-sighted, grumpy and a baked potato where their brain should be – ISO 100; F5.6; 1/160 second
Okuti Camp, Botswana
After 3 nights in Chobe we had our first light aircraft transfer to the Delta. It was 55 minutes of sheer hell. My wife loved it. As a fairly nervous passenger at the best of times, I found that by the third one I’d got a bit more used to them, but I’ll never get to a point where I enjoy them.
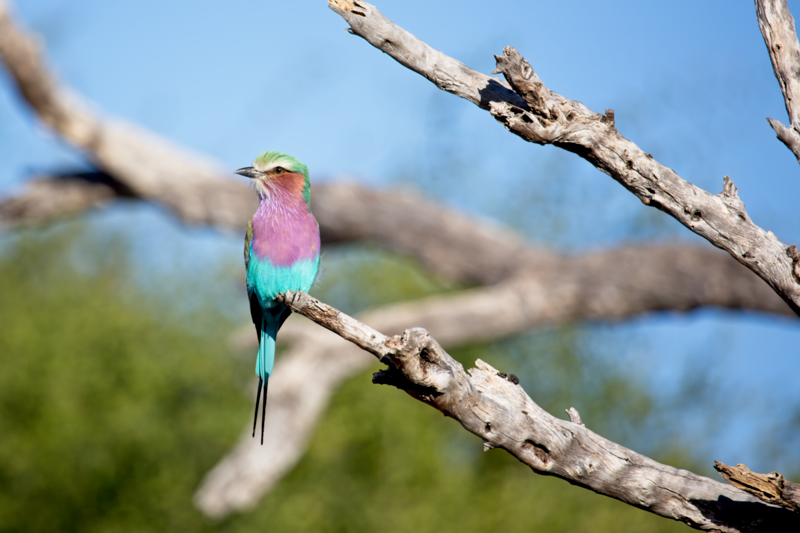
Lilac crested roller – ISO 100; F5.6; 1/800 second
The Okuti camp was absolutely stunning. We ended up staying in a family unit – basically a permanent tent-like structure, with a balcony looking onto a lagoon. We’ve been lucky enough to stay at some pretty fancy places down the years, and Okuti was right up there with the best of them.
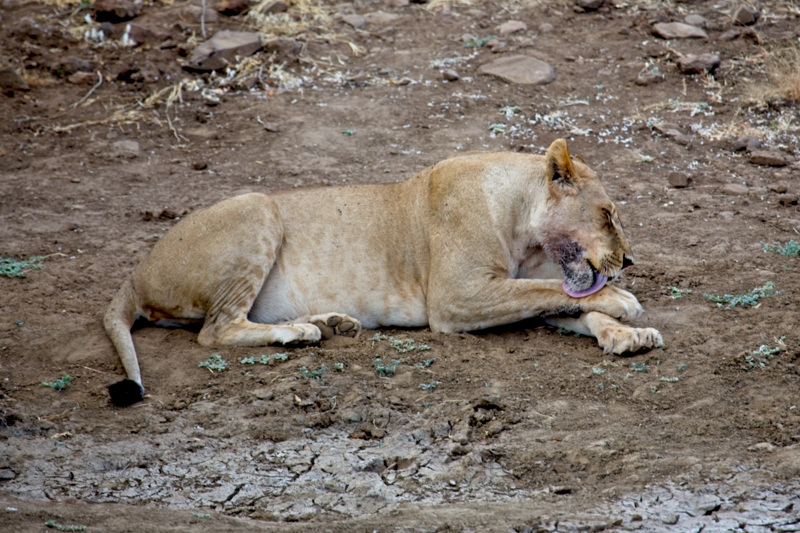
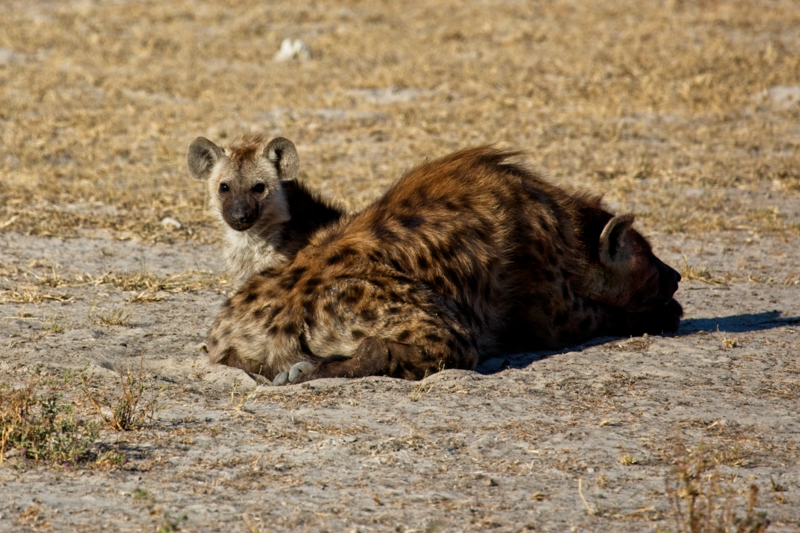
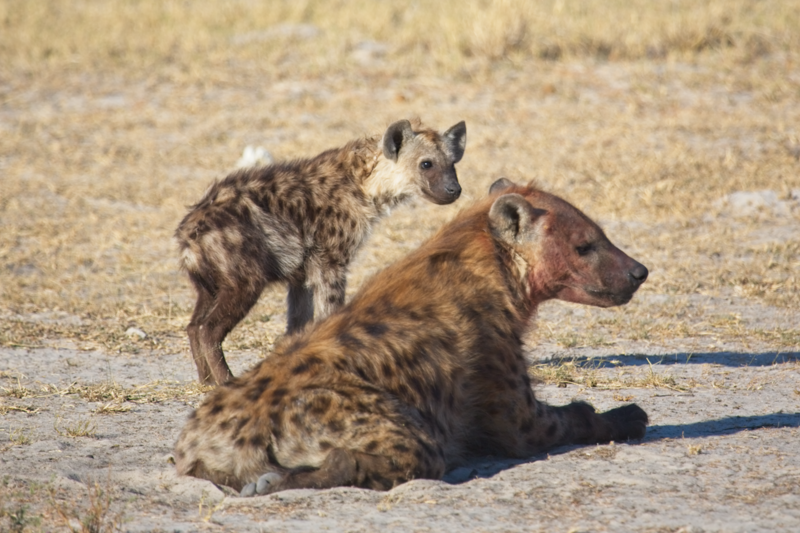
Hyena mother with pup – ISO 160; F8; 1/640 second Now be honest Mum: did you actually wash your face this morning? ISO 160; F5.6; 1/1250 second
The staff were amazing. On our last night, we were surprised with a private dining experience – they had set up a table on one of the remote parts of the raised walkway around the camp, surrounded in candles – to celebrate a significant birthday my wife had a few months back. We hadn’t mentioned it, so it must have been passed on by our travel company. It was a really nice touch. So we ate our fantastic meal and drank champagne, listening to hippos grumbling and vaguely wondering if it was safe.
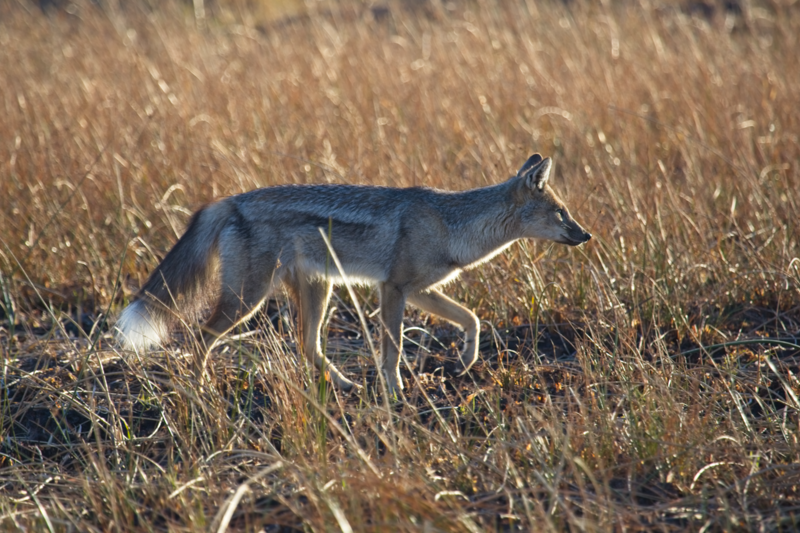
Side-striped jackal – ISO 200; F5.6; 1/400 second
Kanana Camp, Botswana
Our last two nights were in Kanana, via a 25 minute flight
on a 5 seater Cessna. That suffered from the strangest turbulence I’ve ever
encountered. Imagine sitting in an old mini, which is suspended – and swinging
wildly from – a rope, but 4.5k feet in the air. Once again, my wife loved it.
The nutter.
Kanana is in a private concession. This was a new one on me:
it means the guides are allowed to drive off-road. The animals are still
completely free to wander: the only fences are there to try to keep the larger
creatures out of the camp.
The already-impressive game moved up a notch at this place.
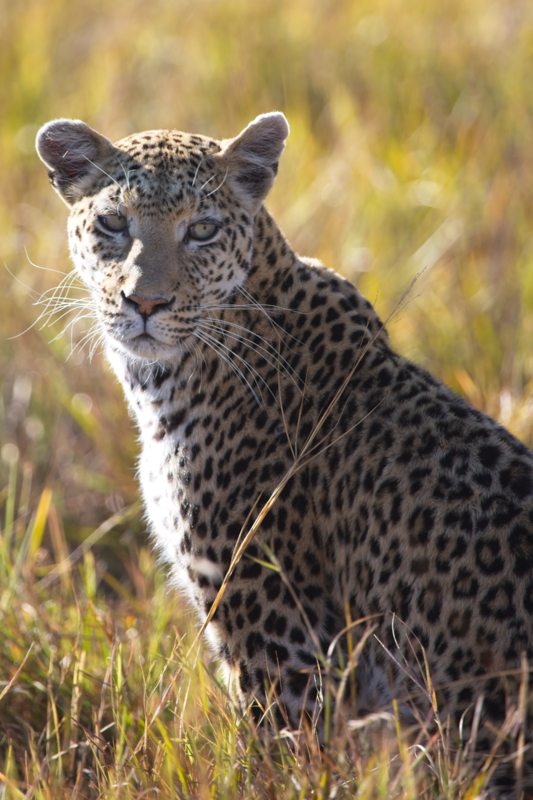
Hello, gorgeous – ISO 160; F5.6; 1/400 secondSay ‘ah’ – ISO 160; F5.6; 1/640 second
This is one of my favourite photos from the trip:
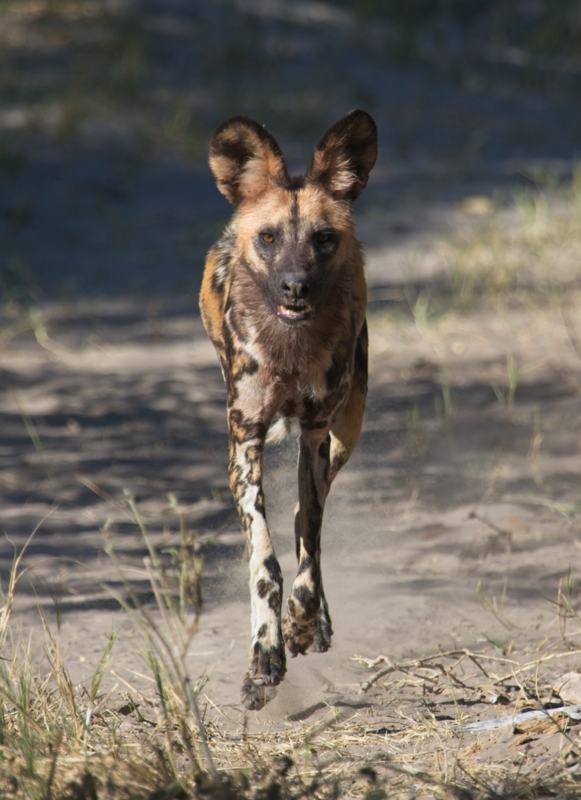
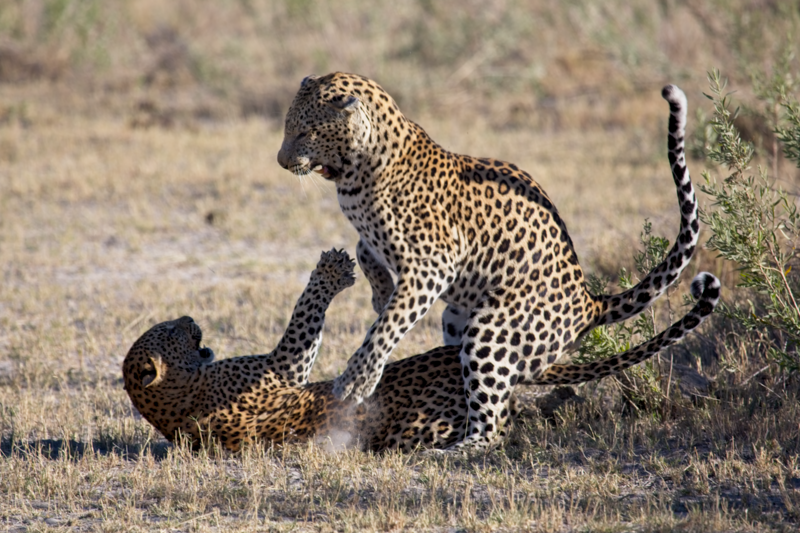
Painted wolf (AKA African wild dog) – ISO 500; F8; 1/800 second Lovers’ tiff – ISO 160; F7.1; 1/500 second
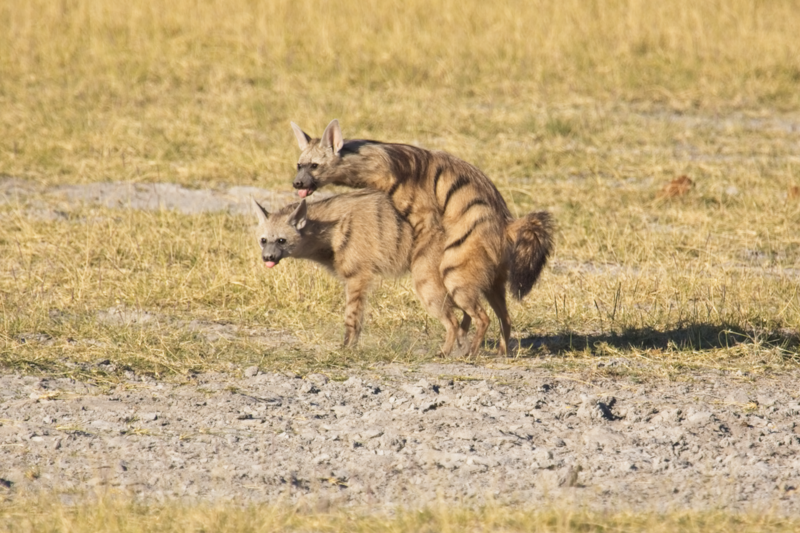
The Aard-animals
I’m going to include a couple of shots that aren’t great, but which are of animals that are less common to see. First up we have the aardwolves, having an intimate moment in a not particularly intimate location (i.e., in plain sight):
Aardwolves – ISO 250; F9; 1/800 second (with extender)
I’d never heard of these before – I think they look a bit like a science project that went a bit wrong. We were quite a long way from the loving couple. With the 1.4x extender, I’ve found that adjusting the focus while holding the shutter release down (firing off about half a dozen shots) generally gives some reasonable results. It’s not pin-sharp, but it’s the best I got.
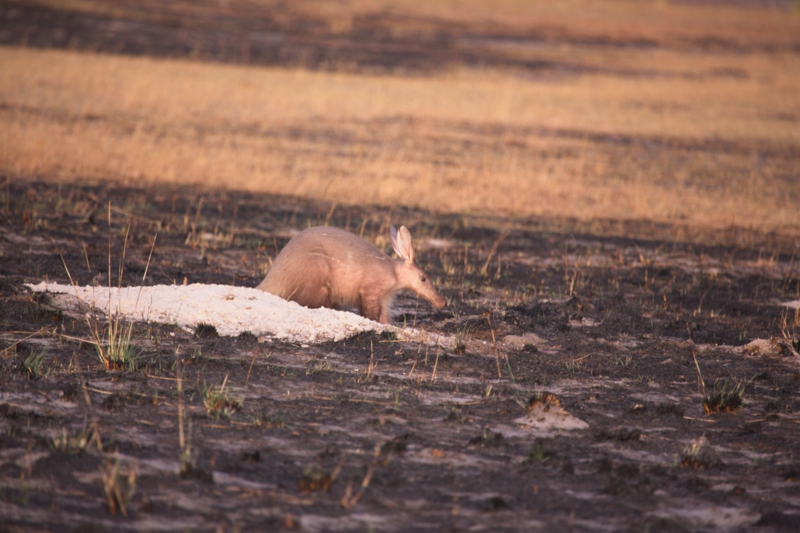
Next up we have an aardvark:
Aardvark – ISO 2500; F5.6; 1/10 second
The sun was going down when I took this so I really pushed the ISO. I jammed the camera into the arm rest on the jeep to keep it steady for the slow shutter. It’s ok, and about as good as I could have hoped for. They are odd looking spuds, got to be said.
…And home again
The trip home was a slog. A 25 minute flight – which my wife sat in the co-pilot’s seat for – on a light aircraft, which took us to Maun. From there we got on a reassuringly large SA Airways flight back to Jo’burg. That flight was notable for having the most bizarre food we’ve had since our fruit salad with prawns on an internal flight in Vietnam 10 years ago. I had cold meatballs, served with what appeared to be minced up pasta mixed with coleslaw.
Yum.
The flight from Jo’burg was long but uneventful. And so we are back in the startlingly grey Blighty, fatter than when we left, and talking about nothing except the wildlife, the hospitality and the downright fabulousness of Botswana.
I’ll add a few more pics and videos when I get round to it.