New York Trip

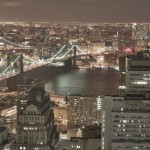
I’m just back from a very cold week in New York. A few interesting results. The first is a reasonably pleasing shot from Manhattan [taken from the 52nd floor of a downtown hotel] looking towards Brooklyn:
Brooklyn HDR

Brooklyn HDR

This is bracketed around a 5 second shot at F5. Shooting through glass has caused a few distortions, especially with the red fluorescent light towards the top right. I think it’s still quite a nice shot though.

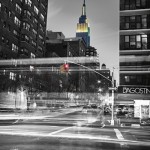
I had some time to myself so spent an afternoon in Manhattan last Sunday waiting for sundown for a few long exposures to take shape. As you do! Anyway, my original plan was to take some stock shots of the Chrysler building, so I spent a bit of time trying to get a reasonable vantage point [I settled on 44th and 3rd]. But unfortunately, a particularly dull sky and unpleasing composition means that the results were all destined for the cutting room floor. I walked quite a long way [down to the PATH station at the World Trade], and stopped off at 35th and 3rd to take this shot of the Empire State:
Empire State HDR

Empire State HDR

This is bracketed around a 13 second exposure at F14, and towards the ‘narrower’ end of my 10-22. There’s a lot going on in the foreground with the motion blurs from the passing traffic, but I quite like the effect. I decided to pull the Superbowl themed colour of the Empire State back into the shot as well.

Finally, I picked up an intervalometer when I was in town. I went for a cheap and cheerful 3rd party manufacturer rather than Canon’s own and it is a fantastic little piece of kit.

Here is a link to the results of my first time lapse, which is comprised of around 1450 exposures [at which point the battery expired]. I read up on this and used a couple of tricks to extend the battery, and go some way towards reducing the wear and tear on the camera’s moving parts. It’s shot in Liveview mode, so no need for the mirror to flap with each shot. I also plugged in the external monitor cable to fool the camera into turning off the LCD. Google this: there are lots of tips around. Each image here is an 8 second manual exposure, with the intervalometer set to a 10 second gap. I set the white balance to whatever preset was returning the most similar result to the auto setting.

For creating the animation I played around with a few Mac specific options. iMovie has a limited maximum framerate available. Default is 0.2 seconds, but I think I read somewhere you can get this up to 15. I had a brief play with ffmpeg, before running into some compiler issues that I could have fixed but, frankly couldn’t be bothered to work around [I basically needed to do a full re-install of the Xcode tools]. So I settled on the lazy option which was to upgrade to Quicktime Pro.

This was fine for producing a .Mov file at the desired 24 frames per second, but it seems to hang when trying to convert to MP4. I haven’t figured this out, but I’m guessing that it is sulking either over the frame rate or the dimensions. It’s a bit annoying because there is a lot of compression in the YouTube version, and it would look pretty good on my iPad. I’m going to persist with this and see if I can figure it out.

I guess the process is more interesting than the result :). My original idea was to leave it running overnight to create an animation of intensive building work that is taking place in lower Manhattan, but a change of hotel plans meant that I was in Jersey by the time I got my hands on the intervalometer.

Automatic exposure, for the more interesting transition from night to day [for instance] requires post processing to remove the flickering that results from the variations in metering. I haven’t discovered an affordable way of doing this, as I don’t fancy splashing out for professional video processing software to flatten this out.

Aperture Vault Problems…

I’ve had the strangest problem with Aperture, and I’ve absolutely no idea what went wrong. I’ve been using it for over a year, and merrily backing up to a vault on my NAS device, as referenced files. It’s always been a bit glitchy with the ‘finding’ of the masters if I subsequently want to make a change: I would do a path update, and still have the offline master warning if I tried to relocate it. The only way that I could reliably get this to work en masse was by doing a vault update – no big deal as these were sporadic enough to coincide with backup activity anyway. I should mention that, because the NAS device is noisy and slow, I only turn it on when I have to.

Anyway, the arrival of my AppleTV around the end of January has prompted a lot of looking back at old projects, editing, and metadata slicing and dicing as a consequence – smart folders organised by Faces etc. I decided over the weekend that I’d do mass ‘consolidate master file’ update over about a year’s worth of  projects, and it crashed at some stage. It’s hard to say when as I left it running overnight to do it.

The next night I decided to to the path update and vault sync, and rather than taking about 5 minutes, the sync took about 4 hours. I decided to have a look at the NAS directory structure and the vault appears to have turned itself inside out. Having read up on this a bit, if you don’t specify a location for the masters when you load the images from your camera [or some other storage], Aperture will put them inside the vault package. I’ve duly looked and it’s almost empty. I now find myself with about 5,500 pictures in two separate directories, one where the vault is, and one in the directory above. By a process of elimination [i.e., deleting them, then trying to resync, and watching Aperture delete previews from the library. I had backed them up before!] I’ve discovered these are the masters.

The naming convention is peculiar, with the files have been renamed in numeric order in the format <unknown>_nnnn.jpeg [I have a lot of RAW and a few Tif files as well] – the angle brackets are literal.

So the long-term path to recovery is to consolidate the libraries for the period of time that Aperture has been managing my imports; export them to a directory structure reflecting year, month and event, and then creating a brand new library from scratch. From now on I’ll set the image import preferences to copy the pictures from my camera to this manually assigned directory structure – something I should have done from the start.

The masters are all there, in the exploded version of the vault. It’s just that they are mixed up with pre-Aperture days images, and with unrecognisable names. This is going go take quite a while. Especially as Aperture isn’t finding everything… Oh dear…

The irony is that part of the reason I did this in the first place – the mass consolidation – was so that Apple TV would have access to the highest quality images. This is almost certainly daft: I can’t imagine that it uses anything other the previews – dumping 20 meg raw files down the wireless network for slideshows is extremely unlikely.

One last piece of weirdness: my entire library has converted itself to referenced, right across the board.

Ely Cathedral – HDR

Yesterday I found myself in another of England’s finest cathedrals within the space of a couple of weeks. It was the a return visit to Ely Cathedral for photography: last summer I had a major problem with my old tripod that led, via a long and torturous route, to the tripod that I should have bought in the first place.

I had some satisfactory results in full-on HDR mode, after lessons learned in Peterborough. All but the first four shots are neutral; the last two have the Gotham dial turned up to 11.

These types of interior / tripod shots can be quite labour intensive, especially when the camera is pointing either straight up or at a steep angle. Where the light is low, you have little choice but to use manual focus. Combining manual with Live Preview on 10x magnification can get very sharp results. But pointing the camera upwards means getting low enough to the ground to see the screen, which can get uncomfortable over the course of a couple of hours.

Some brief lens asides at this point. Lofting the 24-105mm to an angle of about 70 degrees or higher causes the zoom to slip, which can be quite annoying. Also, with my 10-22mm lens, I’ve found that I can get much sharper results on manual focus than I can with auto – obviously this only applies to tripod shots where you are probably going to get the tweezers out later anyway.

Towards the end of the afternoon I wasted about 20 minutes being completely bamboozled by the camera. I had bracketing on, but the camera insisted on only taking the central exposure, with the auto exposure asterisk merrily flashing away. I’m going to have to get the manual out on this one. I had turned off the timer in the drive mode briefly to take a couple of flash shots, and turning it back on – I think – fixed it, but I’m not convinced. The external light was starting to fade by this time, so the other possibility was that the camera couldn’t expose the darkest of the bracketed shots, i.e., without going above 30 seconds on F22. I lost the head to the point that I very nearly walked out of the cathedral without my flash.

And I’m not sure I would have been able to convince my wife that losing my flash would have been “my camera’s fault” :).