Ok, the title is a shabby attempt to window dress what may not be the most mass-appeal posting [I have to play to my audience of 4!], but I’m going to write it up because I have struggled to find information on this online…
I had a problem with my National Geographic branded baby Manfrotto when I was on holiday, with the ballhead slipping on a couple of potentially cracking long exposure shots. I was really disappointed at the time, all the more so when I ringed the clamp at the end of a holiday. It’s only a problem when I am in portrait mode: supporting the weight of the camera horizontally [relative to the position of the post on the ballhead that holds the quick-release], rather than bearing straight down through the fitting, obviously requires the clamp to be much tighter.
I cleaned off some of the lubricant when I got home, and that has largely fixed the problem. That said, I find myself on the horns of a dilemma with my tripod. On the negative side, I’m on the weight limit [1.2kg I think]. I’ve never really gotten on that well the adjustments that are possible with the single clamp. It was a real forehead slapping moment when I suddenly realised that I couldn’t use my new purchase to do panoramas, something that’s not a problem with some of the higher end ballheads sold as separates.
All that said, I’m loath – not to mention currently exhausted of budget – to replace the tripod completely: it is eminently portable and, beyond the construction limits I’ve hit with load, very well made.
So, I’ve been looking at the possibility of replacing just the ballhead itself. It appears that there are two predominant fittings used by the big manufacturers: 3/8 and 1/4 of an inch on a male thread [relative to the tripod, so the female thread on the head] with some of the higher end heads coming with a converter.
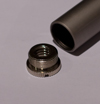
The problem that I have is a completely non-standard female thread on the tripod. Confession time: in uber-scientist mode, I measured the diameter with an inch-tape, and figured it was 5/8 of an inch. Going ‘old money’ was wishful thinking, as the target thread was imperial. With a bit of googling, I thought I’d hit pay-dirt with a potential converter:

The fitting, which I think is called a ‘bush’, is from the music shop in town, and is used for microphone stands. It would have been pretty easy to get a little post on a 3/8 of an inch thread, but unfortunately the bush is a tiny bit too small. The obvious conclusion is that the female thread on the tripod is at a metric diameter. The chances of re-purposing some random piece of plumbing takes a bit of a nose-dive if I need to go from metric to imperial. Oh well, the converter cost all of 50p and, having temporarily caught our cat’s attention, has slowed the rate at which he’s chewing through my ipod cable. :).


